


In this article, we will build a simple microservice application using Docker and deploy it on a local Kubernetes cluster. We will guide you through the entire process, from creating a jar to containerizing the application using Docker, defining a pod and deploying it to a local Kubernetes cluster. You will learn the essential steps to containerize a Spring Boot-based microservice application. By the end of this article, you will have a solid understanding of how to create, containerize, and deploy microservices using Kubernetes.
This article doesn’t cover Kubernetes concepts like deployment and service. For that, check out Deploying and accessing a microservices application in Kubernetes.
Prerequisite Installation
Docker
This article uses Docker as a container run time engine. The Docker can also be used to install the local Kubernetes cluster. You can check the instructions about installing the Docker at the official documentation.
Kubernetes Cluster
There are various ways you can set up and run Kubernetes. You can deploy a Kubernetes cluster on a local machine, cloud, or on-prem data center, or choose a managed Kubernetes cluster.
- Cloud: You can create a free trial account in any public cloud provider (such as AWS, Azure, or Google Cloud) and start a Kubernetes cluster.
- Play with Kubernetes: A lab provided by Docker to quickly get started with Kubernetes.
- Minikube: Using Minikube you can start a local Kubernetes cluster in no time. All you need is a machine with at least 2 CPU, 2GB of free memory, 20GB of free disk space, an internet connection, and either a container (such as Docker) or virtual machine manager (such as Virtual Box)
- Kind: If you have docked installed and configured then you can use kind to spin up a new Kubernetes cluster locally.
- Kubeadm: Kubeadm is another tool using which you can install the Kubernetes cluster locally.
You can run this example using kind (Kubernetes in Docker) or Minikube as a local Kubernetes cluster.
Kubectl
Kubectl is a command-line utility that is used to connect to the Kubernetes cluster. You can check the official documentation for the instructions to install Kubectl.
Code Example
The working code example of this article is listed on GitHub . It’s a simple Spring Boot-based microservice application that exposes two REST endpoints.
POST /products/– to create a product.GET /products/{productId}– to get product information based onproductId.
You can download the code and start the microservice locally in any IDE and test using curl or Postman.
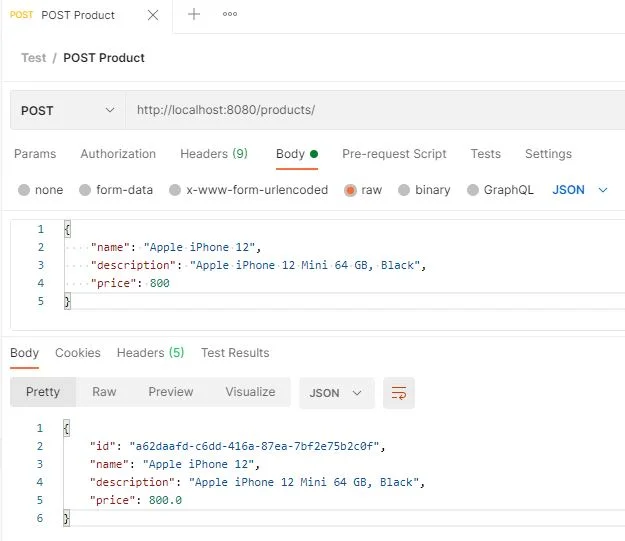
POST Endpoint:
The POST endpoint maps HTTP POST request to /products/ as:
@PostMapping("/products/")
public ResponseEntity<Product> saveProduct(@RequestBody Product product) {
  log.info("Saving product");
  var savedProduct = productRepository.save(product);
  return new ResponseEntity<>(savedProduct, HttpStatus.OK);
}
Request/Response:
curl --location --request POST 'http://localhost:8080/products/' \
--header 'Content-Type: application/json' \
--data-raw '{
    "name": "Apple iPhone 12",
    "description": "Apple iPhone 12 Mini 64 GB, Black",
    "price": 800
}'

//Returns
{
    "id": "7e7e53ee-dc8b-4919-8316-844b310470ac",
    "name": "Apple iPhone 12",
    "description": "Apple iPhone 12 Mini 64 GB, Black",
    "price": 800.0
}
GET Endpoint:
The GET endpoint fetches previously saved products as:
@GetMapping("/products/{productId}")
public ResponseEntity<Product> getProduct(@PathVariable String productId) {
  log.info("Fetching product {}", productId);
  var productOptional = productRepository.getProduct(productId);
  Product product = productOptional.orElseThrow(RecordNotFoundException::new);
  return new ResponseEntity<>(product, HttpStatus.OK);
}
Request/Response:
curl --location --request GET 'http://localhost:8080/products/7e7e53ee-dc8b-4919-8316-844b310470ac'

//Returns
{
    "id": "7e7e53ee-dc8b-4919-8316-844b310470ac",
    "name": "Apple iPhone 12",
    "description": "Apple iPhone 12 Mini 64 GB, Black",
    "price": 800.0
}
Kubernetes Concepts
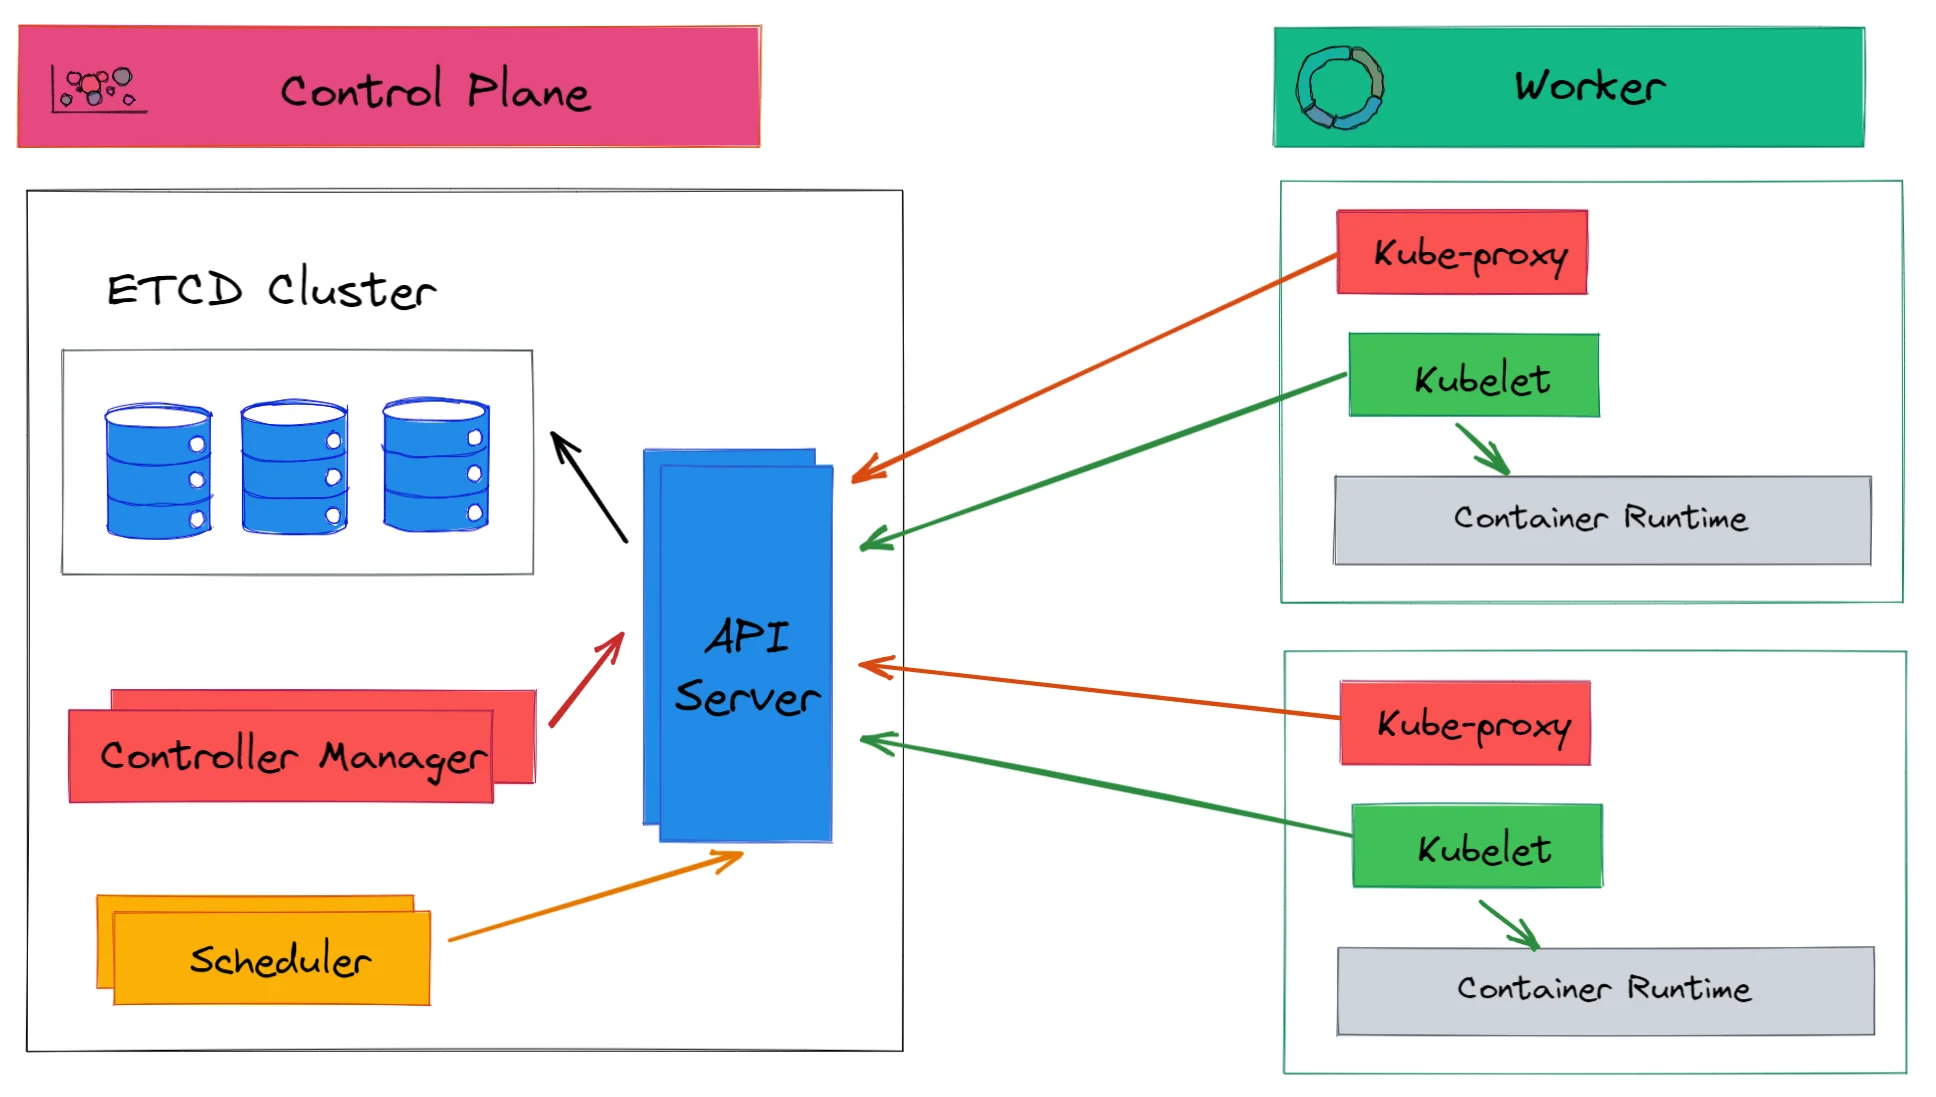
Before we start deploying an application on Kubernetes, we need to familiarize ourselves with some common Kubernetes constructs we are going to use.
POD
Pods are the smallest deployable computing unit that we can create and manage in Kubernetes. A Pod contains one or more containers, with shared storage and network resources and specifications about running containers. A typical microservices application contains multiple Pods, which expose API endpoints to communicate with each other.
Let’s look at a typical Pod definition defined as manifest YAML.
apiVersion: v1
kind: Pod
metadata:
  name: product-svc
  labels:
    app: product
    type: backend
spec:
  containers:
    - name: product
      imagePullPolicy: IfNotPresent
      image: product:1.0
The Pod definition manifest can be broken down into four parts
- ApiVersion – the version of the Kubernetes API we are using
- Kind – the type of Kubernetes object we want to create
- Metadata – the metadata information about the object such as name and labels
- Spec – specification of Pod such as name, container image, etc.
ApiVersion, kind, and metadata are required fields that apply to all Kubernetes objects, not just pods.
We will see later how to run Pods in the Kubernetes cluster.
Container
A Pod encapsulates the container. You can’t run a Pod without defining a container.
A container is a small and lightweight execution environment that makes shared use of the operating system kernel but otherwise runs in isolation from one another
Docker is a popular container technology. To run an application in Docker we first need to create an application image. This can be done using Dockerfile. A Dockerfile is a text file that contains the instructions to set up an environment for a Docker container. For our sample application, Dokcerfile looks like
FROM openjdk:11-jre-slim
RUN mkdir /app
WORKDIR /app

ADD ./target/product-svc-1.0.0.jar /app/app.jar

EXPOSE 8080
ENTRYPOINT ["java", "-jar", "app.jar"]- The
FROMinstruction defines the base image asopenjdk:11-jre-slim. - The
RUNinstruction creates a new directory calledapp. - The
ADDinstruction adds contents of the target directory to the/appdirectory. - The
EXPOSEinstruction instructs Docker that the container listens to the specific port at the runtime. - The
ENTRYPOINTinstruction tells Docker which command to run at the startup.
For more information, you can check the official Dockerfile documentation.
To create a docker image, run the following instructions.
- Creating Spring Boot jar: run the command
mvnw clean package spring-boot:repackagefromproduct-svcdirectory. This will createproduct-svc-1.0.0.jarin/targetdirectory. To test if the application has been packaged successfully run the commandjava -jar target/product-svc-1.0.0.jarfrom the terminal. You should see the logdev.techdozo.product.ProductApplication : Started ProductApplication in 2.643 seconds (JVM running for 3.238) - Creating Docker Image: to create the docker image run the command
docker build . -t product:1.0fromproduct-svcdirectory. To validate if the image has been created successfully run the commanddocker images lsand you should a docker imageproductwith tag1.0. - Run Docker Container: Optionally if you want to validate if the image has been created and can be run successfully, run the command
docker run -p 8080:8080 product:1.0. You should see the spring boot application starting up in the terminal.
If you are using kind then kind has no idea about your local registry. You need to tell kind to load image from the local registry as
kind load docker-image product:1.0 product:1.0
Running Kubernetes Pod
Before you begin, you need to tell Kubernetes to use the correct context. The Kubernetes uses a YAML file called kubeconfig which stores cluster authentication information for kubectl.
You can run the command kubectl apply -f deployments/product-pod-definition.yaml to create Pod. To check if Pod is created correctly run the command kubectl get pods and you see something like
NAME          READY   STATUS    RESTARTS   AGE
product-svc   1/1     Running   0          17m
You can check the log of the pod by using the command kubectl logs product-svc. Once, you run the command you will see the Spring boot log in the terminal.
Accessing Pod Locally
You must be wondering, now we have our product service running in the local Kubernetes cluster, how can I start working with the application? You can use the Kubernetes port forward to access our application locally. Run command kubectl port-forward product-svc 8080:8080 to forward the Product service port 8080 to localhost:8080. Now you can access product service locally on http://localhost:8080/products/.
This is not a production-grade deployment and port forwarding is not recommended for production deployment but it’s a nice tool to debug Kubernetes applications locally.
Summary
In this article, we covered deploying a microservices-based application on a local Kubernetes cluster. We learned how to create a Docker image using a Dockerfile, define a Pod with a Pod manifest file, and deploy the Pod using kubectl. Note that the steps mentioned here are not intended for production deployment (that’s for another article).


Discussion about this post