Techdozo
  • Microservices
    • All
    • GraphQL
    • gRPC
    • Spring Boot
    gRPC Bidirectional Streaming with Code Example

    gRPC Bidirectional Streaming with Code Example

    gRPC Client Streaming

    gRPC Client Streaming

    Distributed transaction in microservices using Saga

    Distributed Transactions in Microservices: implementing Saga with Temporal

    Temporal Workflow Orchestration

    Workflow Orchestration with Temporal and Spring Boot

    GraphQL Directive

    GraphQL Directive

    Spring for GraphQL mutation

    Spring for GraphQL: Mutation

  • Spring Boot
    Spring Boot GraphQL service

    Getting started with Spring Boot GraphQL service

    Deploying a RESTful Spring Boot Microservice on Kubernetes

    Deploying a RESTful Spring Boot Microservice on Kubernetes

    RESTful Microservices with Spring Boot and Kubernetes

    RESTful Microservices with Spring Boot and Kubernetes

    RESTful API Gateway with gRPC

    RESTful API Gateway with gRPC

  • gRPC
    gRPC Bidirectional Streaming with Code Example

    gRPC Bidirectional Streaming with Code Example

    gRPC Client Streaming

    gRPC Client Streaming

    gRPC Interceptor: unary interceptor with code example

    gRPC Interceptor: unary interceptor with code example

    gRPC: synchronous and asynchronous Server streaming RPC

    gRPC: synchronous and asynchronous Server streaming RPC

    Photo by Ramón Salinero on Unsplash

    gRPC: synchronous and asynchronous unary RPC in Java

    Microservices inter-process communication using gRPC

    gRPC for microservices communication

  • GraphQL
    GraphQL Directive

    GraphQL Directive

    Spring for GraphQL mutation

    Spring for GraphQL: Mutation

    Spring for GraphQL: How to solve the N+1 Problem?

    Spring for GraphQL: How to solve the N+1 Problem?

    Spring GraphQL with @Controller, @SchemaMapping and @QueryMapping

    Spring for GraphQL : @SchemaMapping and @QueryMapping

    Spring Boot GraphQL service

    Getting started with Spring Boot GraphQL service

  • Kubernetes
    Deploying a RESTful Spring Boot Microservice on Kubernetes

    Deploying a RESTful Spring Boot Microservice on Kubernetes

    Components of Kubernetes Architecture

    Components of Kubernetes Architecture

    Helm Chart: quick start your app deployment on Kubernetes

    Helm Chart: quick start your app deployment on Kubernetes

    gRPC load balancing on Kubernetes (using Headless Service)

    gRPC load balancing on Kubernetes (using Headless Service)

    Getting started with Kind: quick start a multi-node local Kubernetes cluster

    Getting started with Kind: quick start a multi-node local Kubernetes cluster

    Getting started with Minikube: deploying application on local Kubernetes cluster

    Getting started with Minikube: deploying application on local Kubernetes cluster

  • Java
    Java Streams: Stream Operation with Examples

    Java Streams: Stream Operation with Examples

    Java Streams: stream creation with examples

    Java Streams: stream creation with examples

    Garbage Collection

    Super Fast Garbage Collectors in Java

    Calculus

    Functional Programming in Java

No Result
View All Result
  • Login
  • Microservices
    • All
    • GraphQL
    • gRPC
    • Spring Boot
    gRPC Bidirectional Streaming with Code Example

    gRPC Bidirectional Streaming with Code Example

    gRPC Client Streaming

    gRPC Client Streaming

    Distributed transaction in microservices using Saga

    Distributed Transactions in Microservices: implementing Saga with Temporal

    Temporal Workflow Orchestration

    Workflow Orchestration with Temporal and Spring Boot

    GraphQL Directive

    GraphQL Directive

    Spring for GraphQL mutation

    Spring for GraphQL: Mutation

  • Spring Boot
    Spring Boot GraphQL service

    Getting started with Spring Boot GraphQL service

    Deploying a RESTful Spring Boot Microservice on Kubernetes

    Deploying a RESTful Spring Boot Microservice on Kubernetes

    RESTful Microservices with Spring Boot and Kubernetes

    RESTful Microservices with Spring Boot and Kubernetes

    RESTful API Gateway with gRPC

    RESTful API Gateway with gRPC

  • gRPC
    gRPC Bidirectional Streaming with Code Example

    gRPC Bidirectional Streaming with Code Example

    gRPC Client Streaming

    gRPC Client Streaming

    gRPC Interceptor: unary interceptor with code example

    gRPC Interceptor: unary interceptor with code example

    gRPC: synchronous and asynchronous Server streaming RPC

    gRPC: synchronous and asynchronous Server streaming RPC

    Photo by Ramón Salinero on Unsplash

    gRPC: synchronous and asynchronous unary RPC in Java

    Microservices inter-process communication using gRPC

    gRPC for microservices communication

  • GraphQL
    GraphQL Directive

    GraphQL Directive

    Spring for GraphQL mutation

    Spring for GraphQL: Mutation

    Spring for GraphQL: How to solve the N+1 Problem?

    Spring for GraphQL: How to solve the N+1 Problem?

    Spring GraphQL with @Controller, @SchemaMapping and @QueryMapping

    Spring for GraphQL : @SchemaMapping and @QueryMapping

    Spring Boot GraphQL service

    Getting started with Spring Boot GraphQL service

  • Kubernetes
    Deploying a RESTful Spring Boot Microservice on Kubernetes

    Deploying a RESTful Spring Boot Microservice on Kubernetes

    Components of Kubernetes Architecture

    Components of Kubernetes Architecture

    Helm Chart: quick start your app deployment on Kubernetes

    Helm Chart: quick start your app deployment on Kubernetes

    gRPC load balancing on Kubernetes (using Headless Service)

    gRPC load balancing on Kubernetes (using Headless Service)

    Getting started with Kind: quick start a multi-node local Kubernetes cluster

    Getting started with Kind: quick start a multi-node local Kubernetes cluster

    Getting started with Minikube: deploying application on local Kubernetes cluster

    Getting started with Minikube: deploying application on local Kubernetes cluster

  • Java
    Java Streams: Stream Operation with Examples

    Java Streams: Stream Operation with Examples

    Java Streams: stream creation with examples

    Java Streams: stream creation with examples

    Garbage Collection

    Super Fast Garbage Collectors in Java

    Calculus

    Functional Programming in Java

No Result
View All Result
Techdozo
No Result
View All Result
Home Bitesize

Getting started with Kind: quick start a multi-node local Kubernetes cluster

Pankaj by Pankaj
June 20, 2021
in Bitesize, Kubernetes
Reading Time: 13 mins read
0
A A
0
Getting started with Kind: quick start a multi-node local Kubernetes cluster
1
SHARES
2.2k
VIEWS
Share on FacebookShare on TwitterShare on Linkedin

Kind, also know as Kubernetes in Docker is a tool for creating a local Kubernetes cluster using a Docker container. In this article, we are going to learn:

  • What is Kind?
  • Interacting with Kind
  • Installing ingress controller
  • Accessing application using ingress

What is kind?

Kind allows you to run Kubernetes locally. You can use kind to create a multi-node Kubernetes cluster on your local machine. It’s a great tool for starting local Kubernetes and do a quick prototype.

kind installation

For installation, you can check out the official documentation on the Kind page.

Creating a cluster

Once you have Kind installed, you can create a Kubernetes cluster by running the below command:


kind create cluster

This command outputs :


Creating cluster "kind" …
  • Ensuring node image (kindest/node:v1.21.1) 🖼  …
  ✓ Ensuring node image (kindest/node:v1.21.1) 🖼
  • Preparing nodes 📦   …
  ✓ Preparing nodes 📦
  • Writing configuration 📜  …
  ✓ Writing configuration 📜
  • Starting control-plane 🕹️  …
  ✓ Starting control-plane 🕹️
  • Installing CNI 🔌  …
  ✓ Installing CNI 🔌
  • Installing StorageClass 💾  …
  ✓ Installing StorageClass 💾
 Set kubectl context to "kind-kind"
 You can now use your cluster with:
 kubectl cluster-info --context kind-kind

By default, it creates a cluster with the name kind. You can use --name flag to create a cluster with a different context name.

You can pass additional configurations to customize your cluster. For example, the following configuration creates a multi-node cluster – one control plane and two child nodes. To create a multi-node cluster save the below code in a YAML file, say kind-config.yaml, and run the command kind create cluster --config kind-config.yaml --name kind-multi-node


apiVersion: kind.x-k8s.io/v1alpha4
kind: Cluster
nodes:
  - role: control-plane
  - role: worker
  - role: worker

To list cluster, run the command kind get clusters, which outputs:


kind
kind-multi-node

In order to interact with a specific cluster, you need to specify the cluster name as a context in kubectl as:


kubectl cluster-info --context kind-kind-multi-node

To delete a cluster, use the command kind delete cluster with optional --name flag. If the flag is not specified, kind will use the default cluster context name kind and delete that cluster.
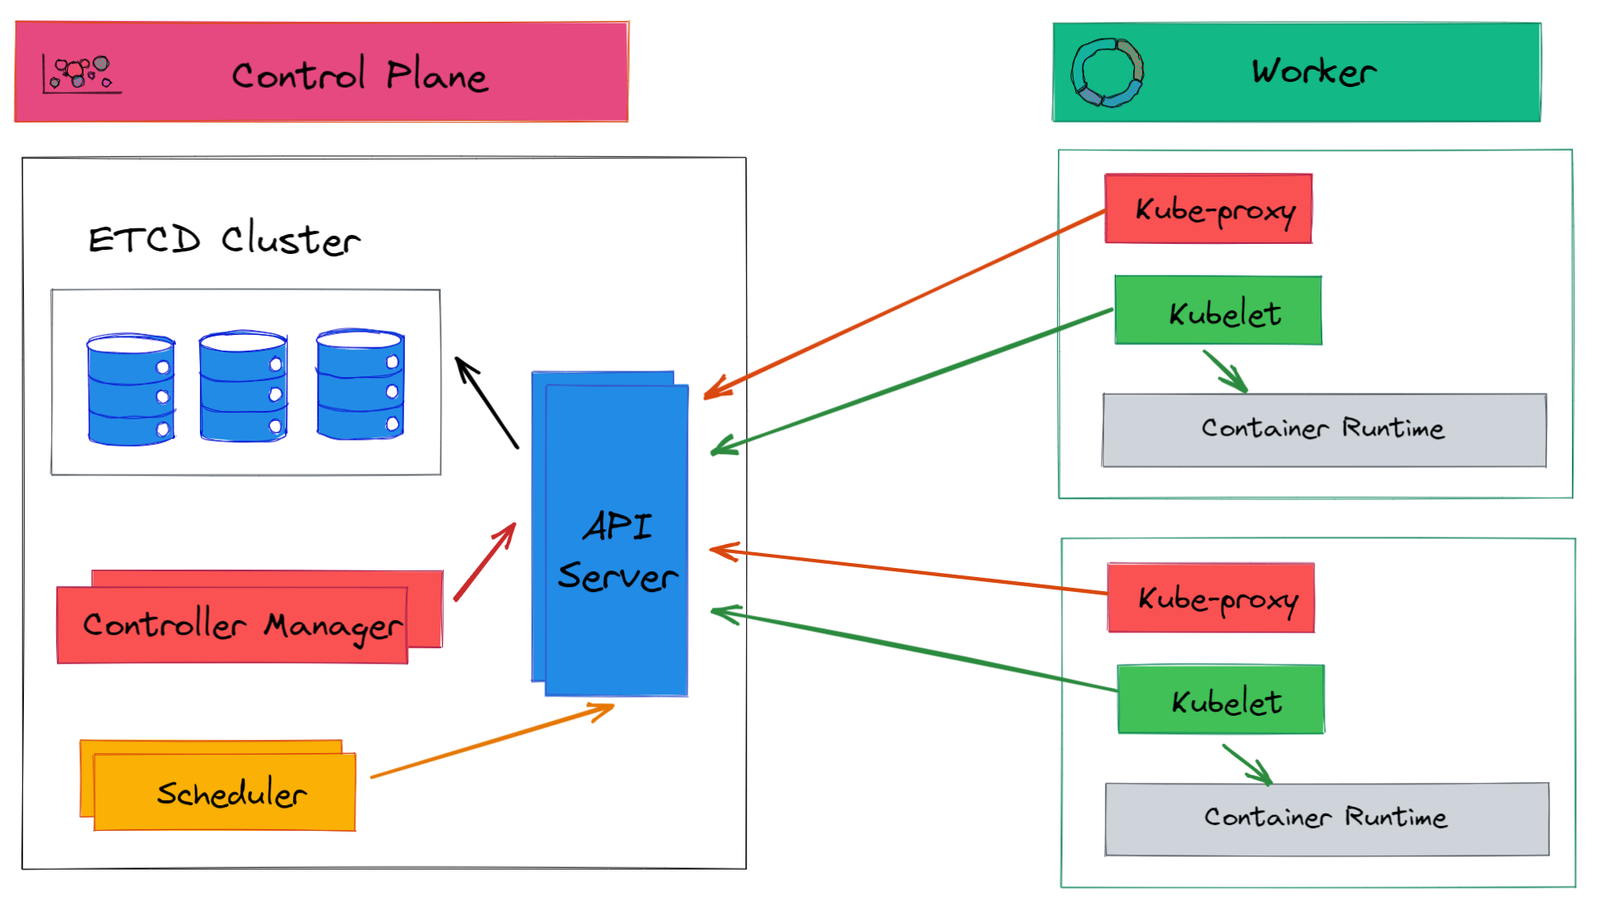
Kubectl

Kubectl is the Kubernetes command-line tool. You can use kubectl to deploy applications, inspect and manage cluster resources, view logs, and many more things. To install, check the official documentation.

You can check kubectl reference documentation for details about each command and supported flags. For now, you mostly need to understand the commands listed below:

  • kubectl get – list resources (example kubectl get pods)
  • kubectl describe – show detailed information about a resource (example kubectl describe pod <pod_name>)
  • kubectl logs – print the logs from a container in a pod (example kubectl logs <pod_name>)
  • kubectl exec – execute a command on a container in a pod (example kubectl exec --stdin --tty <pod_name> -- /bin/bash)

You can interact with the kind cluster using kubectl. For example, to list all pods in all namespace run command:


kubectl get pods -A

To check details about nodes run command kubectl get nodes. This outputs:


NAME                            STATUS   ROLES                  AGE   VERSION
kind-multi-node-control-plane   Ready    control-plane,master   22m   v1.21.1
kind-multi-node-worker          Ready                           21m   v1.21.1
kind-multi-node-worker2         Ready                           21m   v1.21.1

Creating a POD

Pods are the smallest deployable computing unit that you can create and manage in Kubernetes. A pod contains one or more containers, with shared storage and network resources and specification about how to run containers.

To create a pod, save the below code in a YAML file, say pod.yaml, and run the command kubectl apply -f pod.yaml


apiVersion: v1
kind: Pod
metadata:
  name: product-svc
  labels:
    app: product
spec:
  containers:
    - name: product
      imagePullPolicy: IfNotPresent
      image: techdozo/product-svc:1.0.0

To validate if the pod is created successfully run command kubectl get pods -o wide


NAME          READY   STATUS    RESTARTS   AGE   IP           NODE                      NOMINATED NODE   READINESS GATES
product-svc   1/1     Running   0          84s   10.244.2.2   kind-multi-node-worker2              

Note that -o wide option tells you that this particular pod is deployed on the node kind-multi-node-worker2.

To delete a pod use the command kubectl delete pod product-svc.

Creating a Deployment

You can use Kubernetes deployment to create multiple replicas of identical pods. Using deployment pods can be rolled out predictably (rolling update strategy) so that none of the users of your application experience downtime.

To create a deployment, save the below code in a YAML file, say deployment.yaml, and run the command kubectl apply -f deployment.yaml


apiVersion: apps/v1
kind: Deployment
metadata:
  name: product
  labels:
    app: product
spec:
  replicas: 3
  selector:
    matchLabels:
      app: product
  template:
    metadata:
      labels:
        app: product
    spec:
      containers:
        - name: product
          imagePullPolicy: IfNotPresent
          image: techdozo/product-svc:1.0.0

You can validate deployment by running the command kubectl get deployment


NAME      READY   UP-TO-DATE   AVAILABLE   AGE
product   3/3     3            3           64s

You can validate pods created by deployment by running the command kubectl get pods


NAME                      READY   STATUS    RESTARTS   AGE
product-7b865c97d-4nn5q   1/1     Running   0          38s
product-7b865c97d-bddgs   1/1     Running   0          38s
product-7b865c97d-z9lrc   1/1     Running   0          38s

Creating a Service

A Kubernetes service is an abstraction that defines a logical set of pods (usually determined by a selector) and a policy to access them. There are different types of services in the Kubernetes. For more information, you can check the Kubernetes service.

To create a Kubernetes service of type ClusterIP, copy the following code in service.yaml and run command kubectl apply -f service.yaml.


apiVersion: v1
kind: Service
metadata:
  name: product-service
spec:
  type: ClusterIP
  selector:
    app: product
  ports:
    - port: 80
      targetPort: 8080

This creates a ClusterIP service called product-service. You can check this article to know the details about other types of services in Kubernetes.

To validate, run command kubectl get service.


NAME              TYPE        CLUSTER-IP      EXTERNAL-IP   PORT(S)   AGE
kubernetes        ClusterIP   10.96.0.1       <none>        443/TCP   37m
product-service   ClusterIP   10.96.252.213   <none>        80/TCP    11s

Creating an Ingress

Ingress exposes HTTP(S) routes, such as /products, from outside the cluster to services within the cluster. You can define the traffic routing rule in the Ingress resource. It’s the responsibility of the Ingress controller to fulfill the ingress rules.

To create ingress, copy the following code in ingress.yaml and run command kubectl apply -f ingress.yaml


apiVersion: networking.k8s.io/v1
kind: Ingress
metadata:
  name: app-ingress
spec:
  rules:
    - http:
        paths:
          - path: /products
            pathType: Prefix
            backend:
              service:
                name: product-service
                port:
                  number: 80

To validate ingress, run command kubectl get ingress.


NAME          CLASS    HOSTS   ADDRESS   PORTS   AGE
app-ingress   <none>   *                 80      11s

Installing Ingress Controller

Ingress in itself is not enough, you need an Ingress controller to fulfill ingress resources.

For Ingress controller setup, kind cluster needs to be recreated with extraPortMappings and node-labels.

  • extraPortMappings allow the local host to make requests to the Ingress controller over ports 80/443.
  • node-labels only allow the ingress controller to run on a specific node(s) matching the label selector

To delete the existing multi-node cluster, run command kind delete cluster --name kind-multi-node.

To create a cluster, save the following code in kind-config.yaml and run command, kind create cluster --config kind-config.yaml.


apiVersion: kind.x-k8s.io/v1alpha4
kind: Cluster
nodes:
  - role: control-plane
    kubeadmConfigPatches:
      - |
        kind: InitConfiguration
        nodeRegistration:
          kubeletExtraArgs:
            node-labels: "ingress-ready=true"
    extraPortMappings:
      - containerPort: 80
        hostPort: 81
        protocol: TCP
      - containerPort: 443
        hostPort: 443
        protocol: TCP
  - role: worker
  - role: worker

Notice, hostPort: 81 in extraPortMappings. This exposes Ingress controller over port 81.

To install the NGINX Ingress controller, run command kubectl apply -f https://raw.githubusercontent.com/kubernetes/ingress-nginx/master/deploy/static/provider/kind/deploy.yaml. This command creates pods in an ingress-nginx namespace, which acts as an Ingress controller.


namespace/ingress-nginx created
serviceaccount/ingress-nginx created
configmap/ingress-nginx-controller created
clusterrole.rbac.authorization.k8s.io/ingress-nginx created
clusterrolebinding.rbac.authorization.k8s.io/ingress-nginx created
role.rbac.authorization.k8s.io/ingress-nginx created
rolebinding.rbac.authorization.k8s.io/ingress-nginx created
service/ingress-nginx-controller-admission created
service/ingress-nginx-controller created
deployment.apps/ingress-nginx-controller created
validatingwebhookconfiguration.admissionregistration.k8s.io/ingress-nginx-admission created
serviceaccount/ingress-nginx-admission created
clusterrole.rbac.authorization.k8s.io/ingress-nginx-admission created
clusterrolebinding.rbac.authorization.k8s.io/ingress-nginx-admission created
role.rbac.authorization.k8s.io/ingress-nginx-admission created
rolebinding.rbac.authorization.k8s.io/ingress-nginx-admission created
job.batch/ingress-nginx-admission-create created
job.batch/ingress-nginx-admission-patch created

The above command creates ingress-nginx-controller-<> pod in ingress-nginx namespace. To validate run command kubectl get pods -n ingress-nginx.


NAME                                       READY   STATUS      RESTARTS   AGE
ingress-nginx-admission-create-thnck       0/1     Completed   0          2m7s
ingress-nginx-admission-patch-sczm2        0/1     Completed   1          2m7s
ingress-nginx-controller-744f97c4f-ch5xh   1/1     Running     0          2m7s

As the cluster was deleted, you need to recreate deployment, service, and ingress again.

  • Creating Deployment: to create deployment run the command kubectl apply -f deployment.yaml.
  • Creating Service: to create a service run the command kubectl apply -f service.yaml.
  • Creating Ingress: to create an ingress run the command kubectl apply -f ingress.yaml.

If you get error ‘Error: Internal error occurred: failed calling webhook “validate.nginx.ingress.kubernetes.io”: an error on the server (“”) has prevented the request from succeeding‘ then this is most likely because of the feature ‘Add validation support for networking.k8s.io/v1‘. For now, just disable the Webhook configuration kubectl delete -A ValidatingWebhookConfiguration ingress-nginx-admission

If you run kubectl get ingress command again you can see the address assigned to localhost.


NAME          CLASS    HOSTS   ADDRESS     PORTS   AGE
app-ingress   <none>   *       localhost   80      22s

Now you can access your application using postman as

Code Example

You can find the source code of the example mentioned in the article at GitHub . The GitHub repo also has instructions to build a Docker image from the source code and push it to the DockerHub repository.

Summary

Kind is a simple yet very powerful tool to start a multi-node local Kubernetes cluster. Setting up the Ingress controller in Kind is very straightforward. You can quickly get started with a local multi-node Kubernetes cluster.

Tags: bitesizekubernetes
Previous Post

Getting started with Minikube: deploying application on local Kubernetes cluster

Next Post

gRPC load balancing on Kubernetes (using Headless Service)

Pankaj

Pankaj

Software Architect @ Schlumberger ``` Cloud | Microservices | Programming | Kubernetes | Architecture | Machine Learning | Java | Python ```

Related Posts

Deploying a RESTful Spring Boot Microservice on Kubernetes
Kubernetes

Deploying a RESTful Spring Boot Microservice on Kubernetes

August 18, 2021
Components of Kubernetes Architecture
Kubernetes

Components of Kubernetes Architecture

July 19, 2021
Helm Chart: quick start your app deployment on Kubernetes
Kubernetes

Helm Chart: quick start your app deployment on Kubernetes

July 7, 2021
gRPC load balancing on Kubernetes (using Headless Service)
gRPC

gRPC load balancing on Kubernetes (using Headless Service)

June 27, 2021

Discussion about this post

Recent Articles

gRPC Bidirectional Streaming with Code Example

gRPC Bidirectional Streaming with Code Example

February 17, 2023
gRPC Client Streaming

gRPC Client Streaming

January 20, 2023
Distributed transaction in microservices using Saga

Distributed Transactions in Microservices: implementing Saga with Temporal

November 8, 2022
Temporal Workflow Orchestration

Workflow Orchestration with Temporal and Spring Boot

October 29, 2022
  • Trending
  • Comments
  • Latest
Deploying a RESTful Spring Boot Microservice on Kubernetes

Deploying a RESTful Spring Boot Microservice on Kubernetes

August 18, 2021
Temporal Workflow Orchestration

Workflow Orchestration with Temporal and Spring Boot

October 29, 2022
gRPC Interceptor: unary interceptor with code example

gRPC Interceptor: unary interceptor with code example

April 30, 2022
Microservices inter-process communication using gRPC

gRPC for microservices communication

August 29, 2021
Calculus

Functional Programming in Java

0
Java Streams: stream creation with examples

Java Streams: stream creation with examples

0
Garbage Collection

Super Fast Garbage Collectors in Java

0
Java Streams: Stream Operation with Examples

Java Streams: Stream Operation with Examples

0
gRPC Bidirectional Streaming with Code Example

gRPC Bidirectional Streaming with Code Example

February 17, 2023
gRPC Client Streaming

gRPC Client Streaming

January 20, 2023
Distributed transaction in microservices using Saga

Distributed Transactions in Microservices: implementing Saga with Temporal

November 8, 2022
Temporal Workflow Orchestration

Workflow Orchestration with Temporal and Spring Boot

October 29, 2022
Facebook Twitter Pinterest

TECHDOZO

Simplifying modern tech stack!

Browse by Category

  • Bitesize
  • GraphQL
  • gRPC
  • Java
  • Kubernetes
  • Microservices
  • Spring Boot

Recent Articles

gRPC Bidirectional Streaming with Code Example

gRPC Bidirectional Streaming with Code Example

February 17, 2023
gRPC Client Streaming

gRPC Client Streaming

January 20, 2023

© 2023 Techdozo.

No Result
View All Result
  • Home
  • gRPC
  • Kubernetes
  • Microservices
  • GraphQL

© 2023 Techdozo.

Welcome Back!

Sign In with Google
OR

Login to your account below

Forgotten Password?

Retrieve your password

Please enter your username or email address to reset your password.

Log In