


In the previous post, RESTful Microservices with Spring Boot and Kubernetes, I explained how to design and develop a microservice application using Spring Boot.
Although this post talks about the Spring Boot application, the concepts discussed apply to any microservice application.
Are you curious about how to deploy microservices on Kubernetes, the most popular choice for running microservice applications?
Let’s get started:
What is Kubernetes?
Kubernetes allows us to deploy the containerized microservice application in public, private, or hybrid cloud infrastructure. Kubernetes is an open-source container orchestration platform. Some of the important features of Kubernetes are:
- Automated rollouts and rollbacks
- Service discovery
- Self-healing
- Horizontal scaling
What is a container?
A container is an executable that packages code and all its dependencies in a standard unit. As a result, a containerized application runs quickly and reliably from one computing environment to another. Some container runtimes supported on Kubernetes are Docker, containerd, and CRI-O.
In this post, I will use Docker as a container runtime. You can check the instructions about installing Docker in the official documentation.
Creating a container for microservice
Assuming you have Docker installed, the next step is to build a container image. For that, we will use Dockerfile.
A Dockerfile is a text file containing instructions to set up an environment for a Docker container. Docker can build images automatically by reading the instructions from a Dockerfile.
For instance, Dockerfile for product-catalog microservice is:
FROM openjdk:11-jre-slim
RUN mkdir /app
WORKDIR /app

ADD ./build/libs/product-catalog-svc-0.0.1.jar /app/app.jar

EXPOSE 8080
ENTRYPOINT ["java", "-jar", "app.jar"]- The
FROMinstruction defines the base image asopenjdk:11-jre-slim. - The
RUNinstruction creates a new directory calledapp. - The
WORKDIRinstruction sets the working directory for nextADDinstruction. - The
ADDinstruction adds the content of thebuilddirectory to the/appdirectory. - The
EXPOSEinstruction instructs Docker that the container listens to the specific port at runtime. - The
ENTRYPOINTinstruction tells Docker which command to run at the startup.
To build a container image from Dockerfile, we must follow the steps below.
1. Create Spring Boot jar
To build the Spring Boot jar, run the command gradlew clean build from the root directory product-catalog-svc. This command packages all classes and dependencies in a jar. This is made possible by Spring Boot’s Gradle plugin, defined as:
plugins {
	id 'org.springframework.boot' version '2.5.3'
}
To validate, run the command java -jar build/libs/product-catalog-svc-0.0.1.jar from the root directory product-catalog-svc. This launches product-catalog microservice on port 8080. You can test the APIs in Postman.
2. Create Docker Image
To create the docker image, run the command docker build . -t product-catalog:1.0.0 from product-catalog-svc directory. This command creates a Docker image product-catalog with tag 1.0.0. You can validate if the image has been created successfully by running the command docker image ls. This shows output like:
REPOSITORY          TAG       IMAGE ID       CREATED         SIZE
product-catalog     1.0.0     1b3edac07100   9 minutes ago   261MB
Optionally, if you want to validate if the image can be run successfully, run the command docker run -p 8080:8080 product-catalog:1.0.0. You should see a Spring Boot application starting up. If you want, you can test through Postman by connecting to localhost:8080.
3. Publish Docker container to Docker Hub
A container registry, like Docker Hub, allows you to share container images with others. First, you need to create an account at Docker Hub. After you create a repository in the Docker Hub account, you can push your local image to this repository. You can find full instructions about creating a repository and pushing images to the repository at Docker Hub.
To push the image to Docker Hub, we first had to tag the local image product-catalog with the Docker Hub repository techdozo/product-catalog-svc. This can be done by running the command:
docker tag product-catalog:1.0.0 techdozo/product-catalog-svc:1.0.0Once the image is tagged, we can push the image as:
docker push techdozo/product-catalog-svc:1.0.0Microservice deployment architecture
In this article, we will deploy the product-catalog microservice on the local Kubernetes cluster. Even though this post covers a local deployment, it’s good to understand what a microservice deployment looks like in production.
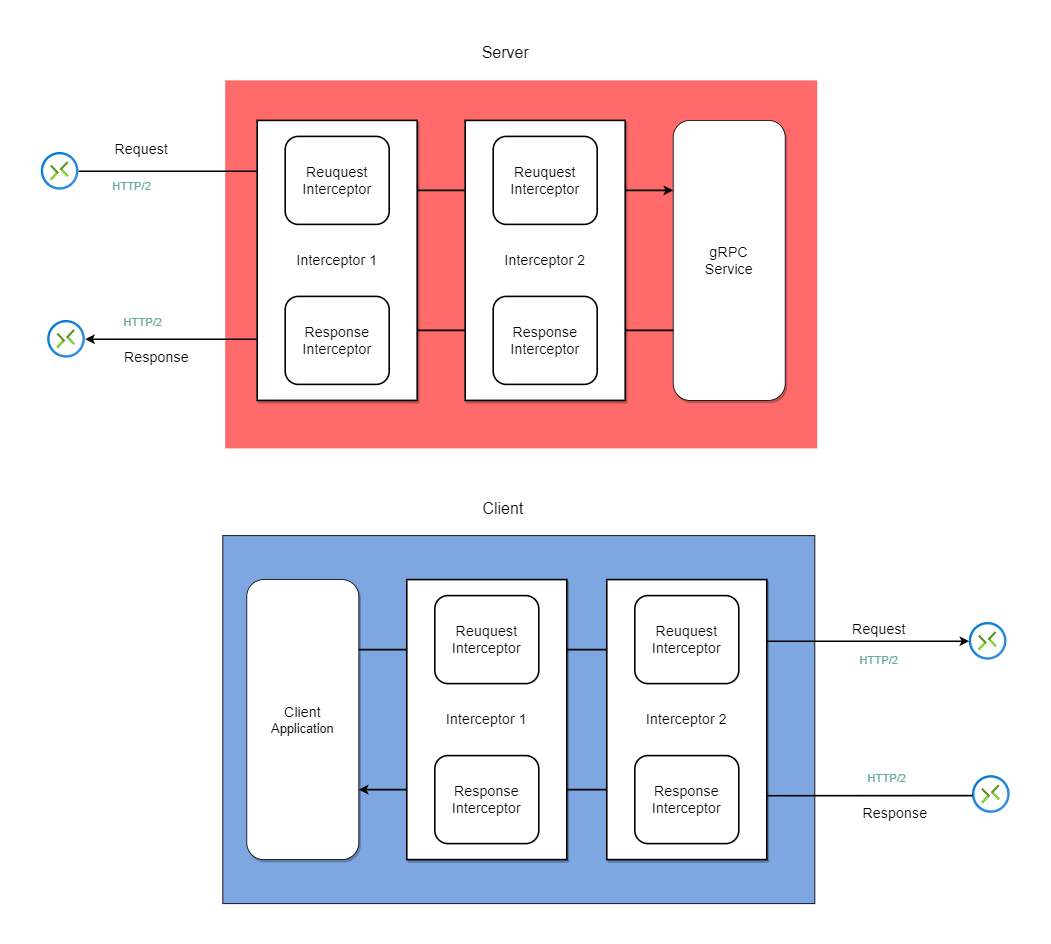
A reference deployment of the microservice application on Kubernetes can look like this:

The deployment consists of the following components.
Kubernetes Cluster
To run a microservices application on Kubernetes, you need a Kubernetes cluster. You can choose the Kubernetes cluster as managed service, for instance – AKS, GKE, or Amazon EKS. Additionally, you can install kubeadm, kubespray, etc., yourselves. For local machines, you can install Kind, Minikub, etc.
Ingress
An Ingress exposes HTTP(S) routes (ingress) as RESTFul web API. For instance, the ingress rule path: /products can be accessed outside the Kubernetes cluster as RESTFul API /products. It’s the responsibility of the ingress controller to fulfil ingress rules.
Load Balancer
The load balancer routes public internet traffic to ingress. It is configured with public IP that fronts the ingress controller. The DNS can be mapped to the public IP of the load balancer. This allows API consumers to call APIs using DNS, for instance – https://example.com/products.
Database
More or less, every application needs a database. In cloud deployment, you have the option of choosing a managed database. Additionally, you can opt for a self-managed database.
Utility Service and Observability stack
Besides application services, you may run additional utility services. For instance, container security applications (such as Twistlock), caching (such as Redis), etc.
Observability consists of metrics, tracing, and logging. The observability stack helps collect and store metrics, logs, and application telemetry. You can choose a cloud-managed observability stack. Alternatively, you can use self-managed observability tools. For example, you can use Elasticsearch to store application logs, Prometheus to store application metrics, Grafana for visualization, OpenTelemetry for tracing, and so on.
Container Registry
The container registry helps you to store private container images that can be deployed on the Kubernetes cluster. Most cloud provider has their container registry.
CI/CD pipeline
CI/CD pipelines, such as Jenkins pipelines, help automate builds and deployments.
Helm
Helm is a package manager for Kubernetes. It bundles Kubernetes objects into a single unit that can be deployed, versioned, and updated.
Running local cluster
Having looked at a reference production deployment of microservice, let’s see what a local deployment looks like. The main difference is that you don’t need to provision a load balancer and do DNS mapping; the rest of the steps remain the same.
To run the product-catalog microservice on a local Kubernetes cluster, you can use Kind. For more information, check the post Getting started with Kind: quick start a multi-node local Kubernetes cluster.
To create a cluster, save the following code in kind-config.yaml and run command, kind create cluster --config kind-config.yaml.
apiVersion: kind.x-k8s.io/v1alpha4
kind: Cluster
nodes:
  - role: control-plane
    kubeadmConfigPatches:
      - |
        kind: InitConfiguration
        nodeRegistration:
          kubeletExtraArgs:
            node-labels: "ingress-ready=true"
    extraPortMappings:
      - containerPort: 80
        hostPort: 81
        protocol: TCP
      - containerPort: 443
        hostPort: 443
        protocol: TCP
  - role: worker
  - role: worker
You can validate kind cluster deployment by running the command kind get clusters. This command returns the default cluster name kind.
Local microservice deployment
At a minimum, you need to understand three Kubernetes concepts to deploy a microservice and expose RESTFul web APIs. These are:
- Deployment: provides you with the ability to create replicas of pods.
- Service: a Kubernetes component that allows you to access the pods.
- Ingress: map a web request, for example, /products, to pods via service.
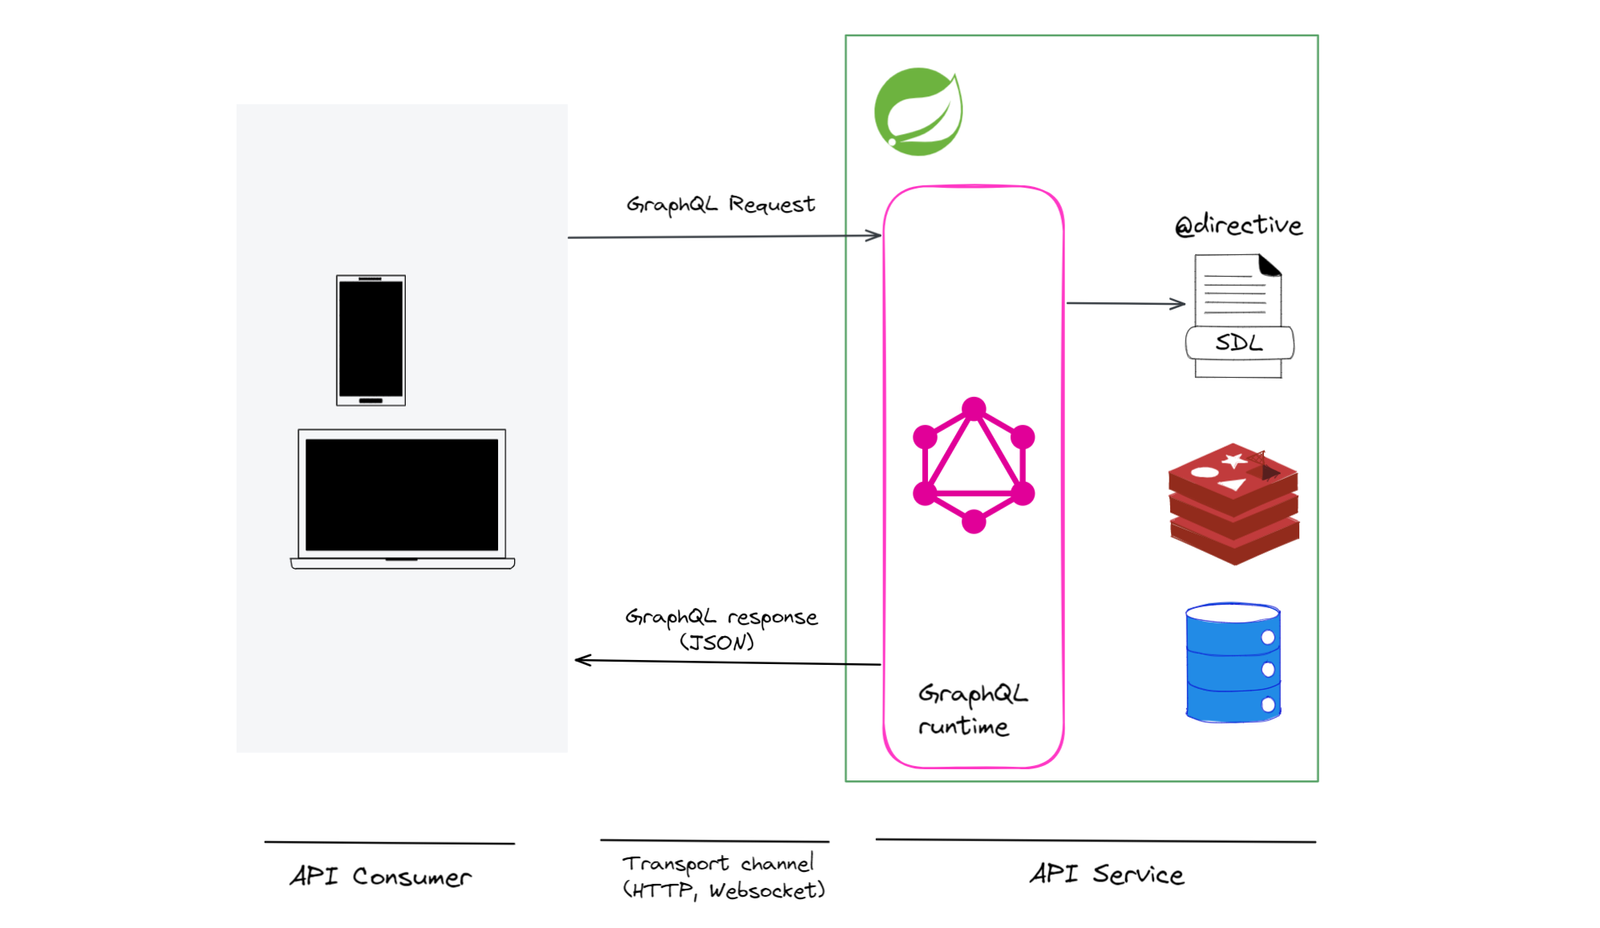
The deployment architecture of our application in the local Kubernetes cluster looks like as:

Let’s look at these components in detail.
Deployment
After publishing the Docker image, you can run the image as a pod on Kubernetes. Pods are the smallest deployable computing unit we can create and manage in Kubernetes. A Pod contains one or more containers, with shared storage and network resources and specifications about running containers. However, mostly you don’t create a pod directly but through a higher-level construct called deployment.
A Kubernetes deployment is a higher-level object that allows you to provide a declarative update to the pods.
What does the declarative update mean?
A Kubernetes object can be created and updated by storing object configuration files (YAML manifest file) in a directory. And then, you can use command
kubectl applyto recursively create and update those objects as needed.In contrast, in imperative approach you directly feed commands to Kubernetes. For example, to create deployment of nginx run command
kubectl create deployment nginx --image nginx.
Using deployments, you can achieve the following:
- Rollout a RelicaSet: when you create a deployment, Kubernetes internally creates a replicaset and desired numbers of pods. Pods can be rolled out predictably, using deployment (rolling update strategy). This ensures that none of the users of your application experience downtime. The Deployment strategy is defined by the field
spec.strategy.typewith possible value RollingUpdate and Recreate, with the default being RollingUpdate - Rollback of earlier Deployment: you can revert to the previous deployment revision if the current deployment is unstable.
- Pod update: If you have a new revision of your application (a new version of the pod), the deployment creates a new replicaset and moves pods from the old replicaset to the new one in a controlled manner.
- Scaling Deployment: A Kubernetes deployment can be scaled to create additional pods to handle the load.
To create a deployment, save the below code in a YAML file, say deployment.yaml, and run the command kubectl apply -f deployment.yaml
apiVersion: apps/v1
kind: Deployment
metadata:
  name: product-catalog
  labels:
    app: product-catalog
spec:
  replicas: 3
  selector:
    matchLabels:
      app: product-catalog
  template:
    metadata:
      labels:
        app: product-catalog
    spec:
      containers:
        - name: product-catalog
          imagePullPolicy: IfNotPresent
          image: techdozo/product-catalog-svc:1.0.0
The above command creates a Kubernetes deployment with three replicas of the pod that matches the labels app: product-catalog. After the above command is run, Kubernetes pulls the Docker image techdozo/product-catalog-svc:1.0.0 from the DockerHub repository and creates pods.
To validate, run command kubectl get pods. You should see something like this:
NAME                               READY   STATUS    RESTARTS   AGE
product-catalog-5fcb6cc8fb-6b45b   1/1     Running   0          43s
product-catalog-5fcb6cc8fb-fp6dk   1/1     Running   0          43s
product-catalog-5fcb6cc8fb-hdmf7   1/1     Running   0          43s
Service
In Kubernetes, pods are ephemeral. Pods are created and destroyed to match replicas defined in deployment. Each pod gets its own IP address, but it is not permanent.
This leads to a problem: if some set of pods (say order microservice) needs to communicate with other pods (say product microservice), how does order microservice keeps track of the IP addresses of the product microservice? This is where Kubernetes Service comes into the picture.
A Kubernetes service is an abstraction that defines a logical set of pods (usually determined by a selector) and a policy to access them.
Service Type
There are four types of Kubernetes services:
- ClusterIP (default): The Service type
ClusterIPexposes service on the internal IP of the cluster. This service is only accessible within the cluster. This is the most common approach used in Kubernetes. - NodePort: NodePort exposes the service at each node’s IP at a static port. NodePort makes service accessible from outside the cluster using
<NodeIP>:<NodePort>. - LoadBalancer: This Service creates an external load balancer in the cloud (such as Google Cloud, or Azure ) and assigns a fixed, external IP to the Service. This is most commonly used when you want to access service directly, for instance, from the external cluster.
- ExternalName: This type of service maps the Service to the contents of the
externalNamefield. This is useful when you want to access an external resource (for example, an external database that is not part of your cluster).
Service Manifest
You can define a Kubernetes service for the product-catalog microservices as:
apiVersion: v1
kind: Service
metadata:
  name: product-catalog
spec:
  type: ClusterIP
  selector:
    app: product-catalog
  ports:
    - port: 80
      targetPort: 8080
The targetPort is the port exposed by the product-catalog microservice Docker container, the port is the port of service itself.
To create a Kubernetes service, copy the above definition in service.yaml and run command kubectl apply -f service.yaml.
To validate, run command kubectl get service, which outputs something like:
NAME              TYPE        CLUSTER-IP     EXTERNAL-IP   PORT(S)   AGE
kubernetes        ClusterIP   10.96.0.1      <none>        443/TCP   15m
product-catalog   ClusterIP   10.96.19.115   <none>        80/TCP    19s
Ingress
In short, ingress exposes HTTP(S) routes, such as /products, from outside the cluster to services within the cluster. You can define the traffic routing rule in the Ingress resource. It’s the responsibility of the Ingress controller to fulfill the ingress rules. Keep in mind, that there is no standard Ingress controller build into Kubernetes, so you must install one of the compatible Ingress controllers.
Ingress Resource
You can define Ingress for product catalog microservice as:
apiVersion: networking.k8s.io/v1
kind: Ingress
metadata:
  name: app-ingress
spec:
  rules:
    - http:
        paths:
          - path: /products
            pathType: Prefix
            backend:
              service:
                name: product-catalog
                port:
                  number: 80
An ingress rule contains the following information:
- Host (Optional): The rules apply to all inbound HTTP traffic if no host is specified. If the host is provided (such as example.com), then rules apply to that specific host.
- Paths: A path has an associated backend defined with a service name and port. The Ingress controller redirects traffic to the reference service if both the host and path match.
To create ingress, copy the above ingress definition in ingress.yaml and run command kubectl apply -f ingress.yaml
To validate ingress, run command kubectl get ingress.
NAME          CLASS    HOSTS   ADDRESS   PORTS   AGE
app-ingress   <none>   *                 80      10s
Ingress Controller
Kubernetes Ingress Controller is responsible for fulfilling ingress rules. To create an Ingress Controller, follow the steps mentioned in the Getting started with Kind: quick start a multi-node local Kubernetes cluster.
After installing the ingress controller, If you run kubectl get ingress command again, you can see the address assigned as localhost.
NAME          CLASS    HOSTS   ADDRESS     PORTS   AGE
app-ingress   <none>   *       localhost   80      13m
Deployment using Helm chart
Alternatively, you can deploy the product-catalog microservice using the Helm chart. You can find the Helm chart in Github .
Before installing the charts, you can do a dry run as:
helm install product-catalog kubernetes\helm\product-catalog --dry-runIf the dry run fails, you may delete earlier deployment, service, and ingress. You can do that by running the command kubectl delete <resource>. For example, to delete a service, you can run the command kubectl delete service/product-catalog
Once you are happy with the dry run, you can install the chart by running the command:
helm install product-catalog kubernetes\helm\product-catalogTesting application
After deploying the application, you can test the application in Postman. For that, you need to change the baseUrl variable to point to port 81 as:

Summary
Kubernetes, an open-source container orchestration platform, allows us to deploy the containerized microservice application in public, private, or hybrid cloud infrastructure.
To deploy a Spring Boot microservice application in Kubernetes, we need the following:
- Create a Spring Boot jar for microservice.
- Create a Docker image with the application jar.
- Define Kubernetes deployment, mentioning the number of replicas of the application.
- Define a service that defines rules to access pods.
- Define an ingress that maps a web request, for example,/products, to pods via service.


Discussion about this post