


What is helm?
Consider you need to deploy a complex microservices application on Kubernetes. Most likely you will end up maintaining many YAML files for each microservices. Maintaining those YAML files is complex and error-prone. This is where Helm comes into the picture.
Helm is an application package manager for Kubernetes (think apt or yum or chocolatey for Windows). Helm downloads, installs and deploys apps for you on the Kubernetes.
Helm helps you manage Kubernetes applications — Helm Charts helps you define, install, and upgrade even the most complex Kubernetes application.
Charts are easy to create, version, share, and publish — so start using Helm and stop the copy-and-paste.
Helm is a graduate project in the CNCF and is maintained by the Helm community.
helm.sh
Using Helm
- You can install, upgrade, and delete installation.
- You can search the repository to find what Kubernetes applications are available.
- You can configure applications prior to installing them.
- You can see what is already installed and how it is configured.
The focus of this article is Helm 3. Earlier version Helm 2 is not recommended anymore.
What is a helm chart?
Helm charts are Kubernetes YAML manifests combined into a package. A chart is a set of files and directory that defines the resources to be installed on the Kubernetes.
Creating your first chart
After installing helm, run command helm create app. This create directory /app. The app directory structure looks like this:
app/
   charts/
   templates/
   .helmignore
   Chart.yaml
   values.yaml
- charts: a directory containing any charts upon which this chart depends.
- templates: a directory of templates that, when combined with values, will generate valid Kubernetes manifest files.
- .helmignore: defines all files to ignore when packaging chart.
- Chart.yaml: a YAML file containing information about the chart.
- values.yaml: default configuration values for this chart.
Chart Definition
If you peek inside Chart.yaml then you’ll see something like:
apiVersion: v2
name: app
description: A Helm chart for Kubernetes
type: application
version: 0.1.0
appVersion: "1.16.0"- apiVersion: v2 denotes Helm 3.
- Version: This is the chart version. You are supposed to make changes to the version every time you make changes to the chart.
- Type: A chart can be either ‘application’ or ‘library’. Application charts are what you deploy on Kubernetes. You can think of a library chart as a utility chart that provides utility functions for the other charts. You can include a library chart with other charts.
- appVersion: the version number of your application. You should increment the version each time you make changes to the application.
Default Configuration
The values.yaml contains the default value used by the chart. For example, by default ‘helm create app‘ command creates an NGINX deployment. You can verify that in value.yaml.
replicaCount: 1
 image:
   repository: nginx
   pullPolicy: IfNotPresent
   tag: ""
It’s possible to override default values but more about this later.
Template
The template directory contains all the manifest files needed for Kubernetes application deployment. A templated file contains a template directive which can be resolved by providing configuration. For example, deployment.yaml has a template directive .Values.replicaCount, that is resolved from replicaCount: 1 of values.yaml.
apiVersion: apps/v1
 kind: Deployment
 metadata:
   name: {{ include "app.fullname" . }}
   labels:
     {{- include "app.labels" . | nindent 4 }}
 spec:
   {{- if not .Values.autoscaling.enabled }}
   replicas: {{ .Values.replicaCount }}
   {{- end }}
A template directive is enclosed in {{ and }} blocks.
Installing a chart
To install a chart run command:
helm install my-app appThis will install a chart app with the installation name my-app.
An installation of a chart is a specific instance of the chart. You can have many installations of the same chart. When you run the helm install command, you need to give it an installation name as well as the chart name.
Running above command prints:
NAME: my-app
LAST DEPLOYED: Sat Jul  3 12:16:04 2021
NAMESPACE: default
STATUS: deployed
REVISION: 1
NOTES:
 Get the application URL by running these commands:
 .....
You can validate Helm installation by running the command kubectl get deployment:
NAME     READY   UP-TO-DATE   AVAILABLE   AGE
my-app   1/1     1            1           9s
or by using command helm list:
NAME    NAMESPACE    REVISION   UPDATED                        STATUS          CHART           APP VERSION
my-app  default      1          2021-07-03 12:46:12.0944218    deployed        app-0.1.0       1.16.0
To uninstall an installation run command helm uninstall my-app. This will remove all resources associated with a particular installation.
A Helm chart installation can contain many Kubernetes resources. Kubernetes sees each of these as a discrete resource. But in Helm’s view, all of the resources defined by a chart are related. So when you run the uninstall command it removes all Kubernetes resources associated with that particular installation. In the above case, Helm removes deployment and service associated with the installation ‘my-app‘.
When you run command helm install my-app app, Helm installs the application my-app on the Kubernetes cluster.
How does the Helm know about which Kubernetes cluster to connect?
As Helm interacts directly with the Kubernetes API server it needs to know about the Kubernetes cluster. Helm does this automatically by reading the same configuration files used by kubectl. It will try to find this information by reading the environment variable $KUBECONFIG. If that is not set, it will look in the same default locations that kubectl looks in.
You can also override these settings with environment variables (HELM_KUBECONTEXT) and command-line flags (--kube-context). It’s recommended that you use Kubectl to manage Kubernetes credentials and let Helm autodetect these settings.
Installing third party chart
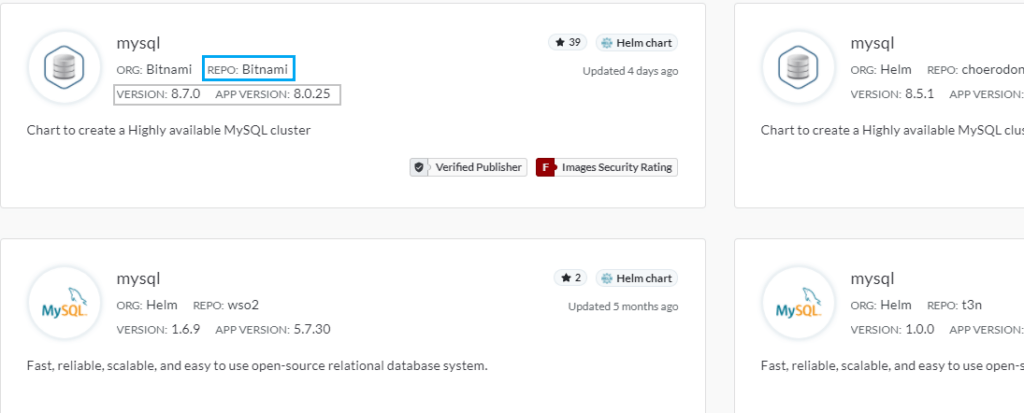
One of the biggest advantages of Helm is that you can use charts (also called packages) published by other authors. Charts are hosted in the chart repository. A Repository is a place where charts can be collected and shared. It’s like maven repository, but for Kubernetes packages. There are many charts repository and the easiest way to find chart repositories is by going to the Artifact Hub. If you search MySQL on the Artifact Hub, you will find chart repositories hosting MySQL charts.
Before you start using the MySQL chart published by Bitnami, you need to tell Helm about the Bitnami repo as:
helm repo add bitnami https://charts.bitnami.com/bitnamiYou can list all repositories, which your Helm knows about, as:
helm repo list

NAME    URL
bitnami https://charts.bitnami.com/bitnami
You can search the chart as:
helm search repo mysql

NAME                    CHART VERSION   APP VERSION     DESCRIPTION
bitnami/mysql           8.7.0           8.0.25          Chart to create..
bitnami/phpmyadmin      8.2.7           5.1.1           phpMyAdmin is an..
...
Installing a chart
You can install the MySQL chart by running the command helm install <installation_name> <chart_name> as:
helm install appdb bitnami/mysql

NAME: appdb
LAST DEPLOYED: Sat Jul  3 16:24:19 2021
NAMESPACE: default
STATUS: deployed
REVISION: 1
TEST SUITE: None
NOTES:
** Please be patient while the chart is being deployed **
.....
You can run helm list to validate MySQL deployment as:
helm list

//output
NAME    NAMESPACE   REVISION   UPDATED                        STATUS          CHART           APP VERSION
appdb   default     1          2021-07-03 16:24:19.3904998    deployed        mysql-8.7.0     8.0.25
Configuring Values
When you installed the MySQL package by running the command helm install appdb bitnami/mysql, it installed MySQL with some default values. You can see the default values in the MySQL chart definition. You can also see the default values of the Helm installation by running the command helm inspect values bitnami/mysql.
helm inspect values bitnami/mysql

## Global Docker image parameters
## Please, note that this will override the image parameters,
including dependencies, configured to use the global value
## Current available global Docker image parameters:
imageRegistry and imagePullSecrets
##
# global:
#   imageRegistry: myRegistryName
#   imagePullSecrets:
#     - myRegistryKeySecretName
# storageClass: myStorageClass
## Bitnami MySQL image
## ref: https://hub.docker.com/r/bitnami/mysql/tags/
##
You can override the default values by providing a values.yaml file with --values flag as:
helm install appdb bitnami/mysql --values values.yaml--values flag can be set with both helm install and upgrade commands.
You can also use --set flag to override default values. If you use --set flag with values.yaml, to override the same value, then –set flag gets precedence.
helm upgrade  appdb bitnami/mysql --values values.yaml
--set auth.rootPassword=$ROOT_PASSWORD

//Output
Release "appdb" has been upgraded. Happy Helming!
NAME: appdb
LAST DEPLOYED: Tue Jul  6 08:32:41 2021
NAMESPACE: default
STATUS: deployed
REVISION: 2
TEST SUITE: None
whereas values.yaml contains:
auth.database: product_dbIt is recommended as a best practice to use values.yaml instead of --set flag. The reason for that is you can version values.yaml in version control.
Helm Release
If you run the helm list command then you’ll see:
NAME    NAMESPACE   REVISION   UPDATED                        STATUS          CHART           APP VERSION
appdb   default     2          2021-07-06 08:32:41.2238541    deployed        mysql-8.7.0     8.0.25
Notice that revision of appdb is marked as 2 with status deployed. When you upgraded a chart, Helm creates a new Release. A Release is an instance of a chart running in a Kubernetes cluster. You can think of a release as a particular combination of configuration and version.
When you run the helm install command, Helm creates a release record. These release records are stored as Kubernetes secret.
kubectl get secret

NAME                          TYPE                                  DATA   AGE
sh.helm.release.v1.appdb.v1   helm.sh/release.v1                    1      49m
sh.helm.release.v1.appdb.v2   helm.sh/release.v1                    1      48m
As you can see, Helm creates a secret record for each release. You can get more information about a release by describing secret as:
kubectl describe secret sh.helm.release.v1.appdb.v2

Name:         sh.helm.release.v1.appdb.v2
Namespace:    default
Labels:       modifiedAt=1625540561
              name=appdb
              owner=helm
              status=deployed
              version=2
Annotations:  <none>

Type:  helm.sh/release.v1
Data
====
release:  43420 bytes
Helm History and Rollbacks
You can use helm history to see the status of chart releases.
REVISION   UPDATED                    STATUS      CHART         APP VERSION   DESCRIPTION
1          Tue Jul  6 10:22:22 2021   superseded  mysql-8.7.0   8.0.25        Install complete
2          Tue Jul  6 10:22:33 2021   deployed    mysql-8.7.0   8.0.25        Upgrade complete
You will notice that version 1 is marked superseded and version 2 is marked deployed. The history command also lists the error message in case of a failed deployment.
If you need to roll back to the previous revision, you can do that using helm rollback <revision>.
helm rollback appdb 1

//output
Rollback was a success! Happy Helming!
If you run the helm history command again you’ll notice that Helm has created a new release and marked earlier release as superseded.
helm history appdb

//output
REVISION   UPDATED                     STATUS        CHART         APP VERSION   DESCRIPTION
1          Tue Jul  6 10:22:22 2021    superseded    mysql-8.7.0   8.0.25        Install complete
2          Tue Jul  6 10:22:33 2021    superseded    mysql-8.7.0   8.0.25        Upgrade complete
3          Tue Jul  6 10:27:16 2021    deployed      mysql-8.7.0   8.0.25        Rollback to 1
Dry Run
Helm dry run provides you the ability to debug helm install and upgrade command. You can do a dry run before applying changes to the Kubernetes using flag --dry-run.
helm upgrade  appdb bitnami/mysql --values values.yaml
--set auth.rootPassword=$ROOT_PASSWORD --dry-run

//Output
Release "appdb" has been upgraded. Happy Helming!
NAME: appdb
LAST DEPLOYED: Tue Jul  6 15:40:29 2021
NAMESPACE: default
STATUS: pending-upgrade
REVISION: 4
TEST SUITE: None
HOOKS:
MANIFEST:
Source: mysql/templates/serviceaccount.yaml
apiVersion: v1
kind: ServiceAccount
metadata:
  name: appdb-mysql
  namespace: default
  labels:
    app.kubernetes.io/name: mysql
    helm.sh/chart: mysql-8.7.0
    app.kubernetes.io/instance: appdb
    app.kubernetes.io/managed-by: Helm
  annotations:
###
.....
While installing a release Helm roughly performs these steps.
- Load entire chart including dependencies.
- Parse the value.
- Execute template and generate YAML. In this step Helm can contact API Server.
- Parse the YAML into Kubernetes object.
- Send to Kubernetes.
The dry run performs all steps except step 5.
During dry run Helm contacts Kubernetes API Server for validation. You must have Kubernetes cluster credential to execute a dry run.
If you don’t have credentials for the Kubernetes server, you can use the helm template command to generate template YAML. As Helm does not contact the API server output of the commands --dry-run and template can differ.
helm template  appdb bitnami/mysql --values values.yaml

//Output
Source: mysql/templates/serviceaccount.yaml
apiVersion: v1
kind: ServiceAccount
metadata:
  name: appdb-mysql
  namespace: default
  labels:
    app.kubernetes.io/name: mysql
    helm.sh/chart: mysql-8.7.0
    app.kubernetes.io/instance: appdb
    app.kubernetes.io/managed-by: Helm
  annotations:
secrets:
  - name: appdb-mysql
Source: mysql/templates/secrets.yaml
apiVersion: v1
kind: Secret
.....
Creating chart
Let’s go through step by step process of creating a chart to deploy the app mentioned in the article Getting started with Kind.
Run command helm create product-svc. This creates a chart product-svc under directory product-svc. To customize, you can modify the file values.yaml.
Deployment
To run three replicas of the pod, modify values.yaml to set replicaCount to 3.
## Old
replicaCount: 1

## New
replicaCount: 3
Modify the image section to set the value of repository and tag as:
## Old
image:
   repository: nginx
   pullPolicy: IfNotPresent
   tag: ""

## New
image:
   repository: techdozo/product-svc
   pullPolicy: IfNotPresent
   tag: "0.0.1"
As product-svc exposes port 8080, change templates/deployment.yaml and set containerPort to 8080. Also, product-svc doesn’t expose ‘/’ endpoint, we need to remove entries for readinessProbe and livenessProbe.
## Old
ports:
 - name: http
   containerPort: 80
   protocol: TCP
livenessProbe:
  httpGet:
    path: /
    port: http
readinessProbe:
  httpGet:
    path: /
    port: http

## New
ports:
  - name: http
    containerPort: 8080
    protocol: TCP
Ingress
As Ingress is defined without a host (listed below), you have to make a couple of changes to make Ingress work.
apiVersion: networking.k8s.io/v1
kind: Ingress
metadata:
  name: app-ingress
spec:
  rules:
    - http:
        paths:
          - path: /products
            pathType: Prefix
            backend:
              service:
                name: product-service
                port:
                  number: 80
Enable Ingress by setting the field enable to true in values.yaml and remove host entry.
## Old
ingress:
  enabled: false
  className: ""
  annotations: {}
  hosts:
    - host: chart-example.local
      paths:
        - path: /
          pathType: ImplementationSpecific
## New
ingress:
  enabled: true
  className: ""
  annotations: {}
  hosts:
    - paths:
        - path: /products
          pathType: Prefix
And then from /templates/ingress.yaml remove host entry.
rules:
     {{- range .Values.ingress.hosts }}
     - host: {{ .host | quote }}
       http:
         paths:
           {{- range .paths }}
           - path: {{ .path }}
//After
rules:
     {{- range .Values.ingress.hosts }}
     - http:
         paths:
           {{- range .paths }}
           - path: {{ .path }}
You can validate generated YAML by running the command helm install product product-svc --dry-run.
kind: Ingress
metadata:
  name: product-product-svc
  labels:
    helm.sh/chart: product-svc-0.1.0
    app.kubernetes.io/name: product-svc
    app.kubernetes.io/instance: product
    app.kubernetes.io/version: "1.16.0"
    app.kubernetes.io/managed-by: Helm
spec:
  rules:
    - http:
        paths:
          - path: /products
            pathType: Prefix
            backend:
              service:
                name: product-product-svc
                port:
                  number: 80
If you are running a local cluster then you can install the Ingress controller using this guide.
Chart Dependency
Dependencies between packages are a very common concern in any installation. Helm solves this by using chart dependencies. Suppose, you need to deploy MySQL DB with your product microservices then you add MySQL chart dependencies in chart.yaml as:
dependencies:
 name: mysql
 version: ^8.7.0
 repository: https://charts.bitnami.com/bitnami
‘^’ in ‘^8.7.0’ denotes the caret range of semantic versioning. This means >=8.7.0 < 9.0.0. The range is a preferred way of defining dependency in the Helm chart. The range helps to pull the latest charts for bugs and security fixes.
To update dependency, run command helm dependency update.
helm dependency update

//Output
Hang tight while we grab the latest from your chart repositories…
…Successfully got an update from the "bitnami" chart repository
Update Complete. ⎈Happy Helming!⎈
Saving 1 charts
Downloading mysql from repo https://charts.bitnami.com/bitnami
Deleting outdated charts
If you check the charts subdirectory, you will notice that Helm has downloaded mysql-8.7.1.tgz.
Locking chart to a specific version
During dependency update Helm performs the following steps.
- Helm reads repository metadata to chart version. From metadata and specified range it finds best match.
- Helm writes resolved information Chart.lock file. This file is used to rebuild the dependencies to an exact version.
- Once, specific version is resolved, Helm downloads dependent chart and puts them in charts subdirectory.
You can run command helm dependency build to download dependencies. This is useful when you have Chart.lock file but no dependencies charts subdirectory.
Defining values for dependent chart
You can pass values from the main chart to the dependent chart. To do that create a new section with the name of the dependent chart in values.yaml file of the main chart.
mysql:
   auth.database: product_db
To deploy the chart with dependency, you can run helm upgrade or uninstall and install the product chart. You can confirm MySQL deployment by running the command kubectl get pods.
kubectl get pods

NAME                                   READY   STATUS    RESTARTS   AGE
product-mysql-0                        0/1     Running   0          6m33s
product-product-svc-7985dc6969-2wzzg   1/1     Running   0          6m33s
product-product-svc-7985dc6969-ndnht   1/1     Running   0          6m33s
product-product-svc-7985dc6969-r9544   1/1     Running   0          6m33s
When to use chart dependency?
Chart dependencies are useful when you want to upgrade dependent applications together. For example, if each of your microservice needs a separate instance of MySQL. In this case upgrade of your application, including dependent chart, becomes atomic. This is a preferred approach if you need to distribute chart to other.
If you run the helm list, you’ll notice that Helm lists only the main chart, not the dependent chart.
helm list

NAME    NAMESPACE   REVISION   UPDATED                       STATUS     CHART               APP VERSION
product default     1          2021-07-07 10:42:34.2606589   deployed   product-svc-0.1.0   1.16.0
Another way of installing dependencies is to install each chart separately. In this scenario, you can upgrade each installation of the chart separately. This is the preferred approach if you create and run charts within your organization.
Chart Example
You can find the chart of the example mentioned in the article at GitHub .
Summary
Helm is much more than the package manager of the Kubernetes. Helm chart is a YAML manifests combined into a package. A chart is a set of files and directory that defines the resources to be installed on the Kubernetes. One of the biggest advantages of Helm is that you can use charts (also called packages) published by other authors. Charts are hosted in the chart repository. A Repository is a place where charts can be collected and shared. The easiest way to find chart repositories by going to the Artifact Hub. You can deploy a third party as a stand-alone chart or as a chart dependency.
Further Reading
- Helm Quickstart Guide
- Book – Learning Helm by Matt Butcher, Matt Farina, Josh Dolitsky


Discussion about this post