


In the last article Building and deploying microservices application locally in the Kubernetes, we understood how to build a simple microservice-based application and deploy it in a local Kubernetes cluster using port-forwarding. However, the port-forwarding approach is mostly suitable for debugging, not for production.
In this article, we will take some steps further towards a production deployment. We will learn how to deploy a microservices application with multiple replicas using Deployment and access the application externally using Service and Ingress.
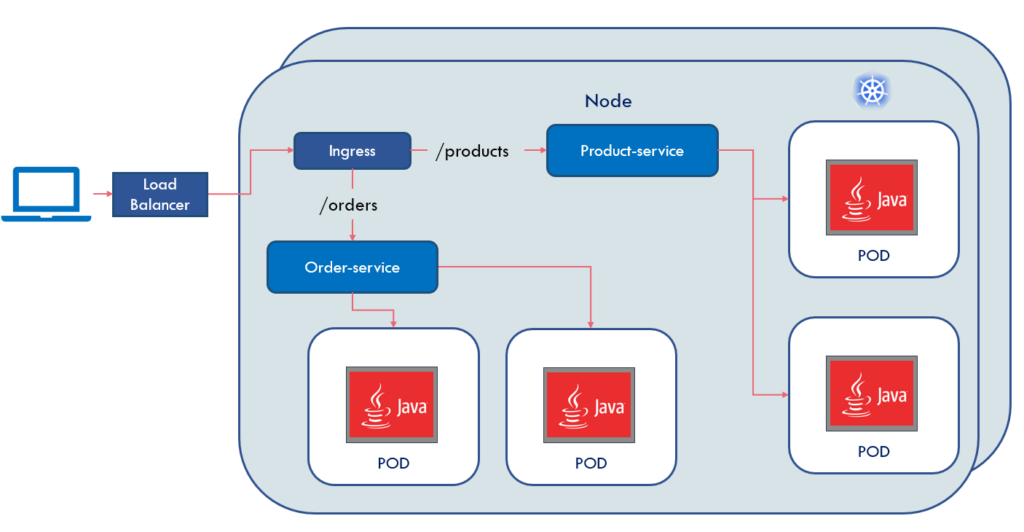
The deployment architecture of such microservices applications may look like as:
Code Example
The working code example of this article is listed on GitHub . This article assumes that you have Kind installed locally but you can run this example in any Kubernetes cluster.
Kubernetes Objects
Building and deploying a single pod is not meant for production. What if you need to run multiple replicas of a pod for high availability and scaling purposes? If you run kubectl apply -f deployments/product-pod-definition.yaml again you’ll see something like pod/product-svc unchanged. In other words, it didn’t create a new pod but just updates the existing pods. In fact in production, most likely, you will never deploy a single pod.
A Kubernetes replicaset solves the problem of creating multiple replicas of your pods.
ReplicaSet
The purpose of replicaset is to ensure the desired number of identical pods are running at any given time. A replicaset definition contains a selector that specifies how to identify pods it can acquire, a number of replicas indicating how many pods should be maintained, and a pod template specifying the data of new pods it should create to meet the number of replicas criteria.
A replicaset spec for Product service can be defined as:
apiVersion: apps/v1
kind: ReplicaSet
metadata:
  name: product
  labels:
    app: product
    type: backend
spec:
  replicas: 3
  selector:
    matchLabels:
      app: product
  template:
    metadata:
      labels:
        app: product
    spec:
      containers:
        - name: product
          imagePullPolicy: IfNotPresent
          image: product:1.0
Some important points to note:
- ApiVersion, Kind – apiVersion, kind, and metadata is a required field.
- Metadata – metadata field defines name and labels. The label field is only applied to the replicaset, not to the pods created by the replicaset.
- Pod Template – the .
spec.templatefield defines the pod template. It also defines the labels of pod which constitute relicaset. The labels defined in the pod template are used by relicaset to create the desired numbers of replicas. - Replicas – the
.spec.replicasfield defines how many pods to run. - Pod Selector – the
.spec.selectoris a label selector. While creating replicas it tries to match specified labels ( as field .spec.selector.matchLabels) with the pod labels
To create replicaset run command kubectl apply -f deployments/product-replicaset-definition.yaml from ~\product-svc directory. The command kubectl get replicaset (shorthand kubectl get rs) returns information about replicaset as:
NAME      DESIRED   CURRENT   READY   AGE
product   3         3         3       4s
To see all pods created by the relicaset, run command kubectl get pods.
NAME            READY   STATUS    RESTARTS   AGE
product-dndls   1/1     Running   0          21s
product-pfw99   1/1     Running   0          54s
product-z46vb   1/1     Running   0          54s
To delete replicaset run the command kubectl delete replicaset product. This will delete the replicaset and all pods associated with it. You can confirm this by running the command kubectl get pods. Now, you should not see any pod running.
One of the purposes of the replicaset is to ensure that desired number of pods are running. To confirm this behavior, let’s delete one of the pods by running the command kubectl delete pod product-dndls. If you run the command kubectl get pods, you’ll see something like:
NAME            READY   STATUS    RESTARTS   AGE
product-pfw99   1/1     Running   0          5m34s
product-qfkw2   1/1     Running   0          42s
product-z46vb   1/1     Running   0          5m34s
As you can see, the pod product-dndls has been deleted but a new pod product-pfw99 has been created.
What happens when you have a running pod with label
app: Product, and you create a replicaset withmatchLabels selector app: Product?In this case, replicaset will acquire an already created pod and create two new pods as defined in the pod template section of replicaset spec definition YAML.
You can use replicaset to maintain the desired number of pods but what if you need to roll back your changes to a previous version or you need to do a rolling update, so that your customer never experiences any downtime? These can be achieved by using a higher-level concept called deployment. The Kubernetes deployment manages replicaset and provides other useful features.
Deployment
A Kubernetes deployment is a higher-level object that allows you to provide a declarative update to the pods and the replicaset.
What does the declarative declaration of Kubernetes Deployment mean?
Kubernetes deployment, like other Kubernetes objects, can be created and updated by storing object configuration files (YAML manifest file) in a directory and using
kubectl applyto recursively create and update those objects as needed.
Using deployments we can achieve:
- Rollout a RelicaSet: when you create a deployment, Kubernetes internally creates a replicaset and desired numbers of pods. Using deployment pods can be rolled out predictably (rolling update strategy) so that none of the users of your application experience downtime. The Deployment strategy is defined by the field
spec.strategy.typewith possible value RollingUpdate and Recreate with the default being RollingUpdate - Rollback of earlier Deployment: you can revert to the previous revision of deployment if the current deployment is not stable.
- Pod update: If you have a new revision of your application (a new version of the pod), the deployment creates a new replicaset and moves pods from the old replicaset to the new one in a controlled manner.
- Scaling Deployment: A Kubernetes deployment can be scaled to create additional pods to handle the load.
We can do many other things using deployment, but we will not go into the details of everything. That needs an article of its own.
The specification of the deployment is similar to the replicaset. You can define a deployment of our Product service as:
apiVersion: apps/v1
kind: Deployment
metadata:
  name: product
  labels:
    app: product
    type: backend
spec:
  replicas: 3
  selector:
    matchLabels:
      app: product
  template:
    metadata:
      labels:
        app: product
    spec:
      containers:
        - name: product
          imagePullPolicy: IfNotPresent
          image: product:1.0
Deleting earlier replicasets
To check if you have any previous replicaset, run the command kubectl get rs. You can delete replicaset by running the command kubectl delete rs <name_of_replicaset>.
Creating a new deployment
A new deployment can be created by running the command kubectl apply -f deployments\product-deployment-definition.yaml from ~\product-svc directory.
Validating deployment
To check if the deployment has been created run the command kubectl get deployment. This outputs something similar to:
NAME      READY   UP-TO-DATE   AVAILABLE   AGE
product   3/3     3            3           14m
To check ReplicaSet created by the Deployment run the command kubectl get rs. This shows you the ReplicaSet created by the Deployment as:
NAME                 DESIRED   CURRENT   READY   AGE
product-665f597f56   3         3         3       10m
To check the pods created by the deployment run the command kubectl get pods. The output shows the number and status of pods as:
NAME                       READY   STATUS    RESTARTS   AGE
product-665f597f56-55zll   1/1     Running   0          10m
product-665f597f56-fxdgw   1/1     Running   0          10m
product-665f597f56-jdczn   1/1     Running   0          10m
So, now we have deployment ready with three pods, how do we access our application? By using port-forwarding we can only access one pod at a time. How do we load balance across multiple pods, after all, we had created multiple pods for scaling our load? All these things tie together by Kubernetes service.
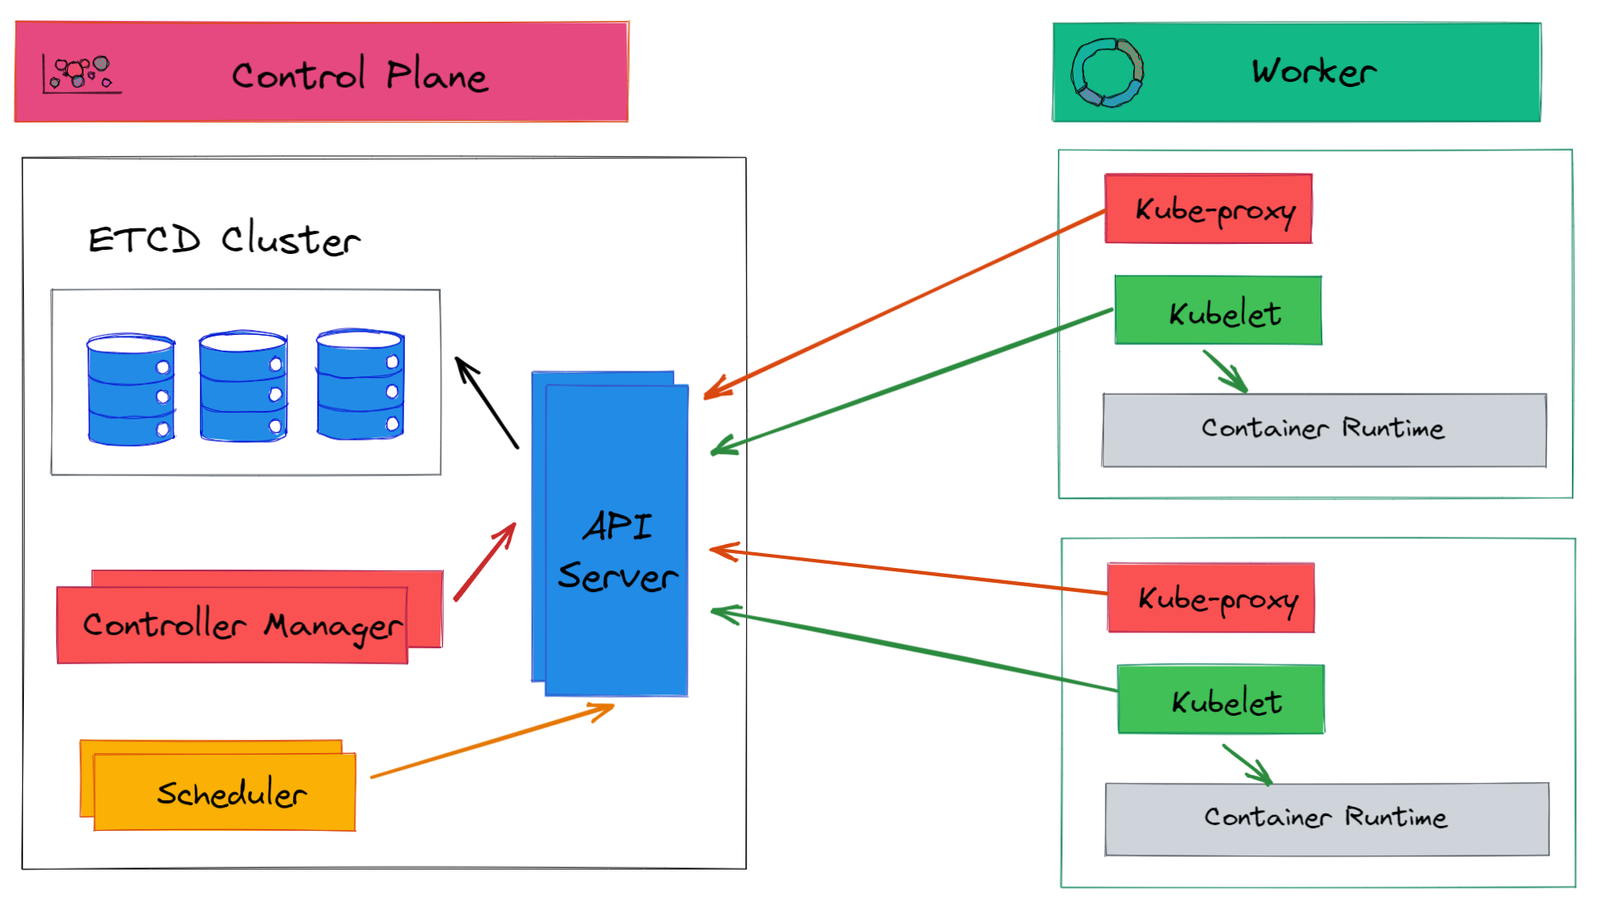
Service
In Kubernetes pods are ephemeral, they are created and destroyed to match replicas defined in your deployment. Each pod gets its own IP address but this IP address is not permanent.
This leads to a problem: if some set of pods (say Order) needs to communicate with other pods (say Product), how does Order Service keeps track of the IP addresses of the Product service? This is where Kubernetes Service comes into the picture.
A Kubernetes service is an abstraction that defines a logical set of pods (usually determined by a selector) and a policy to access them.
Service Type
There are four types of Kubernetes service:
- ClusterIP (default): The Service type ClusterIP exposes service on the internal IP of the cluster. This service is only accessible within the cluster.
- NodePort: NodePort exposes the service at each node’s IP at a static port. NodePort makes service accessible from outside the cluster using
<NodeIP>:<NodePort>. - LoadBalancer: This Service creates an external load balancer in the cloud (such as Google Cloud, Azure ) and assigns a fixed, external IP to the Service.
- ExternalName: This type of service maps the Service to the contents of the
externalNamefield. This is useful when you want to access an external resource (for example an external database, which is not part of your cluster, which can be accessed using a domain name).
Service Manifest
You can define a Service for Product microservices as:
apiVersion: v1
kind: Service
metadata:
  name: product-service
spec:
  type: ClusterIP
  ports:
    - port: 80
      targetPort: 8080
  selector:
    app: product
The targetPort is the port exposed by the Product Service Docker container, the port is the port of service itself.
To create the above service run command kubectl create -f deployments\product-service-definition.yaml from ~/product-svc directory.
To check if service is created successfully, run command kubectl get services, which outputs something like:
NAME              TYPE        CLUSTER-IP     EXTERNAL-IP   PORT(S)   AGE
kubernetes        ClusterIP   10.96.0.1              443/TCP   83m
product-service   ClusterIP   10.96.49.211           80/TCP    56m
Let’s try to understand the role of service using the below example.
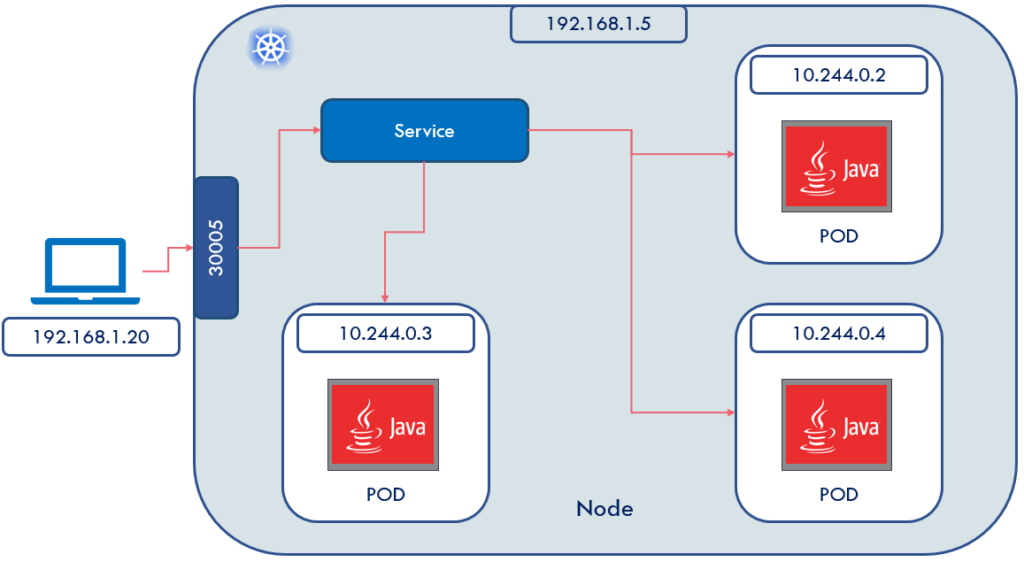
How would you access pods, with IP range 10.244.0.0, from your laptop, which is running on IP 192.168.1.20, to pods deployed on Kubernetes node 192.168.1.5? Clearly, the POD IPs are not exposed outside of the Kubernetes nodes. To solve this problem, you can define a Kubernetes NodePort service to logically group all Pods and expose a port (say 30005). Behind the scene, Kubernetes does the heavy lifting of load balancing your requests to different Pods.
Then can we define a service of type NodePort and access our application as
<NodeIP>:30005?Not exactly. Remember, we had defined
/products/as an API end-point. If we try to doPOST <NodeIP>:30005/products/, Kubernetes will not understand this
So, how can we expose HTTP(S) routes in our microservice application?
Enter Ingress.
Ingress
So, what is ingress? In short, ingress exposes HTTP(S) routes, such as /products, from outside the cluster to services within the cluster. You can define the traffic routing rule in the Ingress resource. It’s the responsibility of the Ingress controller to fulfill the ingress rules. Keep in mind, that there is no standard Ingress controller build into Kubernetes, so you must install one of the compatible Ingress controllers.
Ingress Resource
A typical Ingress for product service can be defined as:
apiVersion: networking.k8s.io/v1
kind: Ingress
metadata:
  name: app-ingress
spec:
  rules:
    - http:
        paths:
          - path: /products
            pathType: Prefix
            backend:
              service:
                name: product-service
                port:
                  number: 80
An ingress rule contains the following information:
- Host (Optional): If no host is specified, the rules apply to all inbound HTTP traffic. If the host is provided (such as example.com) then rules apply to that specific host.
- Paths: A path has an associated backend defined with a service name and port. Ingress controller redirects traffic to reference service if both host and path match.
Creating Ingress Controller in Kind
For Ingress controller setup, the kind cluster needs to be recreated with extraPortMappings and node-labels.
- extraPortMappings allow the local host to make requests to the Ingress controller over ports 80/443
- node-labels only allow the ingress controller to run on a specific node(s) matching the label selector
If you have a cluster running then delete the cluster by running the command kind delete cluster.
To create cluster run command, kind create cluster --config kind/kind-config.yaml from ~/product-svc directory.
apiVersion: kind.x-k8s.io/v1alpha4
kind: Cluster
nodes:
  - role: control-plane
    kubeadmConfigPatches:
      - |
        kind: InitConfiguration
        nodeRegistration:
          kubeletExtraArgs:
            node-labels: "ingress-ready=true"
    extraPortMappings:
      - containerPort: 80
        hostPort: 81
        protocol: TCP
      - containerPort: 443
        hostPort: 443
        protocol: TCP
- role: worker- Creating Deployment: to create deployment run the command
kubectl apply -f deployments\product-deployment-definition.yaml. To make sure kind pulls docker images run commandkind load docker-image product:1.0 product:1.0prior to creating Deployment. - Creating Service: to create a service run the command kubectl apply -f deployments\product-service-definition.yaml
- Creating Ingress: to create an ingress run the command
kubectl apply -f deployments\ingress-definition.yaml
As you know, Kubernetes does not come with a built-in Ingress controller so you have to manually install one. To install the NGINX Ingress controller, run command kubectl apply -f https://raw.githubusercontent.com/kubernetes/ingress-nginx/master/deploy/static/provider/kind/deploy.yaml. This command creates pods in an ingress-nginx namespace, which acts as an Ingress controller.
NAME                                       READY   STATUS      RESTARTS   AGE
ingress-nginx-admission-create-h2t89       0/1     Completed   0          10m
ingress-nginx-admission-patch-bxbf9        0/1     Completed   0          10m
ingress-nginx-controller-9ddc777c5-wkfnw   1/1     Running     0          10m
The pod ingress-nginx-controller-<> needs to be in running status before you start using the ingress controller. To check the ingress controller log, run the command kubectl logs ingress-nginx-controller-9ddc777c5-wkfnw -n ingress-nginx
For more information on installing Ingress for Kind, check Kind Ingress.
Once you have your cluster setup with Ingress, you can validate access using the Postman as:
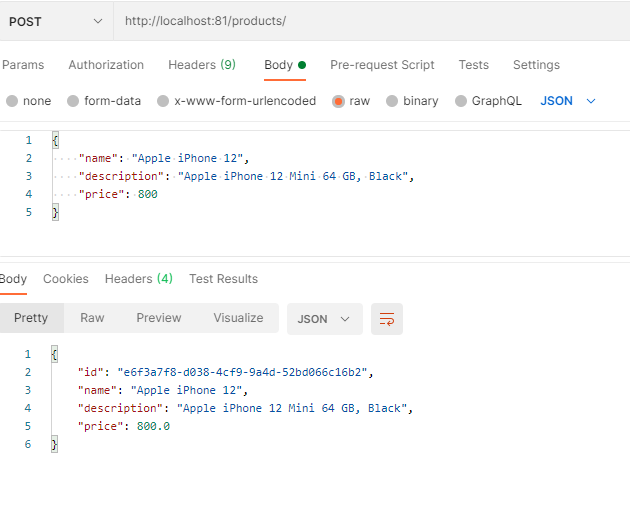
or using curl as:
curl --location --request POST 'http://localhost:81/products/' \
--header 'Content-Type: application/json' \
--data-raw '{
    "name": "Apple iPhone 12",
    "description": "Apple iPhone 12 Mini 64 GB, Black",
    "price": 800
}'
Summary
The Kubernetes deployment allows you to create multiple replicas of the same pod and also ensures the desired number of replicaset are always running. You can group similar pods, to seamlessly access without worrying about keeping track of internal IP addresses, using the Kubernetes service. The Kubernetes ingress API lets you expose your application’s HTTP(S) endpoints to the Internet with routing rules. To implement Ingress, you need to configure a compatible Ingress controller in your cluster. The Ingress controller is responsible for processing ingress rules and allowing traffic to specific Service(s) based on the ingress rules.


Discussion about this post